• 4 BEAN SALAD

    After the holiday season, it always seems like it’s time to tidy up our eating habits.  This doesn’t mean, however, we need to stop enjoying meals.

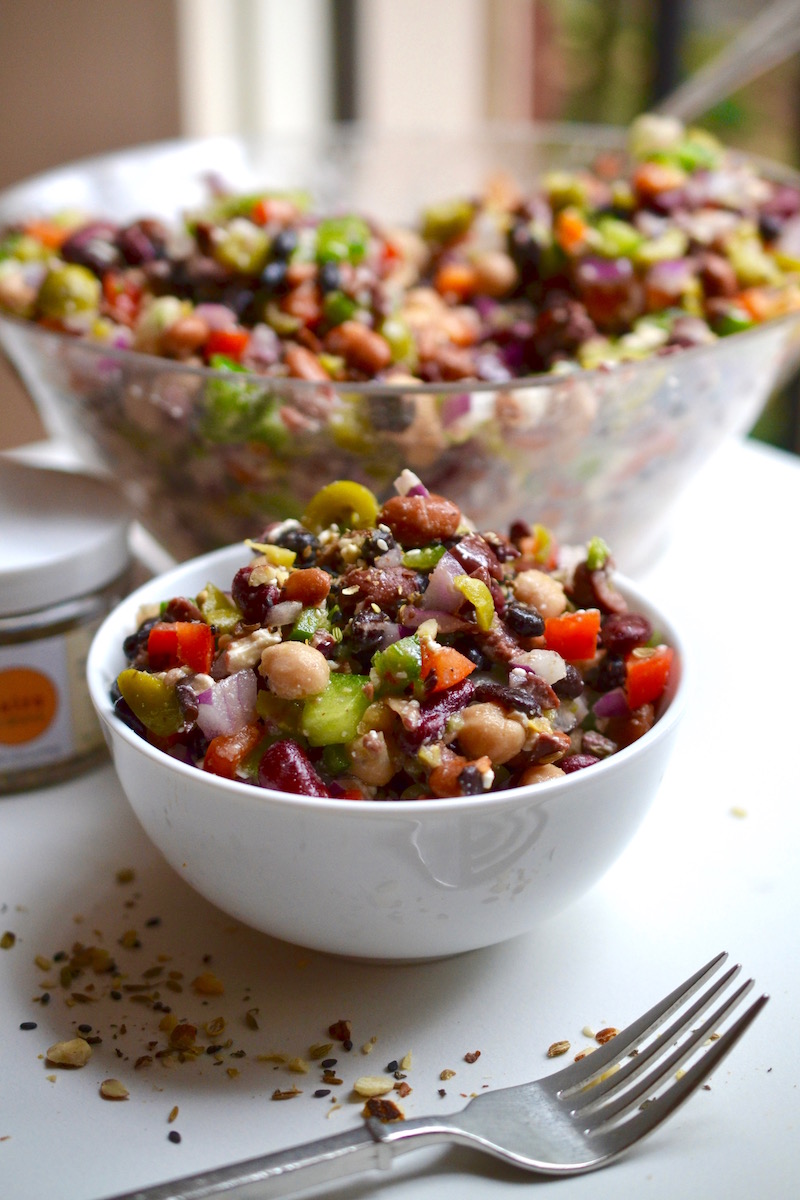
    This 4 bean salad is full of good-for-you ingredients but it is so delicious and enjoyable you just can’t stop eating it.  It is filling, tasty and nutritious.  The 4 different bean varieties add color and flavor, the peppers and onion add crunch, the feta cheese and olives add a salty note and the jalapeño gives the dish a touch of spicy heat.

    This recipe yields a large amount but it stores beautifully in the refrigerator so you can have it on hand and ready for quick spoonfuls when you have those afternoon hunger pangs.  Love, love, love this bean salad – it is a recipe I make often and enjoy it immensely every time.

    owner of Glory Kitchen

    instagram
    facebook

    4 Bean Salad

    8 -12 servings

    Ingredients

      For the vinaigrette dressing:
    • 2 teaspoons Cairo nut & spice mix
    • 2 tablespoons brine (vinegar liquid) from kalamata olives
    • 4 tablespoons olive oil
    • 1 ½ teaspoons dijon mustard
    • 1 teaspoon honey
    • ½ teaspoon salt
    • For the bean salad:
    • Cairo nut & spice mix
    • 1 can black beans, rinsed
    • 1 can red kidney beans, rinsed
    • 1 can pinto beans, rinsed
    • 1 can garbanzo beans (chickpeas), rinsed
    • 1 red onion, small, chopped
    • 1 green bell pepper, medium sized, chopped
    • 1 red bell pepper, medium sized, chopped
    • 1-2 jalapeño, fresh, chopped
    • 3 oz kalamata olives, chopped
    • 1-2 oz green olives, chopped
    • 8 oz feta cheese, crumbled
    • ½ cup parsley or cilantro, fresh & chopped
    • 1 tsp salt

    Instructions

    1. Mix all the ingredients for the dressing and set aside.
    2. After rinsing all the beans thoroughly, place all 4 varieties into a large mixing bowl. Add chopped red onion, all 3 chopped peppers, both chopped olives, chopped parsley (or cilantro), salt, 1 tablespoon Cairo nut & spice mix & crumbled feta cheese. Mix well and store in refrigerator until ready to serve. Can be made the day before.

    Notes

    This delicious recipe makes a large amount of bean salad and it stores well in the refrigerator so you can have it for several meals - or just grab a few spoonfuls when you need a quick and healthy bite for snacking. It can be served as a side to a sandwich but I love to serve a large amount tossed over fresh greens and enjoy it as a full meal.

    Also try this recipe using any of the other Glory Kitchen nut & spice mixes.

    4 Bean Salad - Glory Kitchen
    4 Bean Salad - Glory Kitchen
    4 Bean Salad - Glory Kitchen
    4 Bean Salad - Glory Kitchen
    4 Bean Salad - Glory Kitchen
    4 Bean Salad - Glory Kitchen
    4 Bean Salad - Glory Kitchen
  • RUSSET AND SWEET POTATO FRIES WITH HOMEMADE KETCHUP

    Fresh chopped rosemary and generous sprinkles of Umbria nut & spice mix can add amazing flavor to all types of potatoes.  In this recipe I’ve used two types – russet potatoes & sweet potatoes; both offer different flavors that mix together so well.  Toss them in a bit of olive oil, sea salt, fresh chopped rosemary and sprinkle with crunchy Umbria nut & spice mix to make amazing tasting (and healthy!) french fries.

    I like to keep the skins on for added nutrients and for a rustic and homemade appearance. Serve them with a homemade ketchup and you have a very special version of an all-American favorite.

    Making homemade ketchup was a first for me but after going through the simple process and tasting the fresh flavor, I’ll think twice before ever buying a store brand again.  Most commercial brands are loaded with sugar and include  chemicals and preservatives.  I’ve discovered it is quite easy to make your own ketchup and the flavor is completely unique – in a wonderful way.  So much more depth of flavor and none of that overpowering sugary taste.  Another wonderful discovery is you can make a large batch quite easily and freeze several jars for use at a later time.

    It may sound overwhelming to make homemade ketchup, but I found I already had most of the ingredients sitting in my pantry.  It didn’t take long, and I was able to create something truly flavorful.  Try it – once you start with the simple tomato & vinegar base, you can experiment by adding different flavors to make it your very own.

    Margie Bruner - Glory Kitchen

    owner of Glory Kitchen

    instagram
    facebook

    Russet & Sweet Potato Fries with Homemade Ketchup

    Yield: 6-10 servings

    Ingredients

      For the homemade ketchup:
    • 2 tablespoons olive oil
    • 1 onion, chopped
    • 5-7 cloves garlic, chopped
    • 2 teaspoons sambal chili paste
    • ¼ cup maple syrup
    • 2 teaspoons worcestershire
    • sauce
    • ¼ cup apple cider vinegar
    • 1 ½ teaspoons mustard powder
    • ½ cup tomato paste
    • 1 can whole peeled tomatoes, 28 oz.
    • 1 ½ teaspoons sea salt
    • For the fries:
    • Umbria nut & spice mix
    • 3-4 russet potatoes
    • 3-4 sweet potatoes
    • 2-3 sprigs fresh rosemary
    • olive oil
    • sea salt

    Instructions

      homemade ketchup:
    1. In a large stock pot, heat the oil. Add the onions and cook until lightly browned but not completely caramelized. Add the chopped garlic and brown lightly. Stir in the canned tomatoes and then all the remaining ingredients. Let this simmer on low, covered, for about 20 minutes. Remove the lid and let the tomato mixture cool a bit.
    2. Once it has had a chance to cool, puree the ketchup in a blender until completely smooth. Transfer to airtight glass jars or containers and refrigerate for up to 2 weeks. I usually fill one jar and place it in the refrigerator, then pour the remaining ketchup in glass jars and freeze to have on hand for future use. Should yield about 3-4 cups of ketchup.
    3. fries:
    4. Set the oven temperature to 450°. Wash & dry all potatoes. Prepare a baking sheet (I used one for each of the potato types) and line each with parchment or aluminum foil. Cut each potato into sticks. I like to leave the skins on for better nutrient value and I like the rustic appearance of having skins on. Lay across each baking sheet and drizzle the potatoes with olive oil.
    5. Chop the fresh rosemary very small and sprinkle over the potatoes. Add a generous pinch of salt to each as well as Umbria nut & spice mix. Toss gently to coat the potatoes with oil, herbs & spices. Layer them flat on the baking sheet trying not to overlap too much. This will help brown them more evenly.
    6. Place in a hot oven and bake for about 30-40 minutes or until they are nicely browned and crispy. I like to turn the broiler on at the last moment to crisp the tops. Remove from oven, add more salt (to taste) and more Umbria blend. Serve immediately alongside fresh homemade ketchup.

    Russet & Sweet Potato Fries - Glory Kitchen
    Homemade Ketchup
    Homemade Ketchup
    Homemade Ketchup
    Homemade Ketchup
    Russet & Sweet Potato  Fries with Homemade Ketchup
    Russet & Sweet Potato  Fries with Homemade Ketchup
    Russet & Sweet Potato  Fries with Homemade Ketchup
    Russet & Sweet Potato  Fries with Homemade Ketchup
    Russet & Sweet Potato  Fries with Homemade Ketchup
    Russet & Sweet Potato Fries with Homemade Ketchup
  • CRANBERRY CHICKEN

    This Cranberry Chicken dish is festive for Christmas and the holiday season.  The tender chicken breasts, tart cranberries, and crunchy spices all simmered together and then layered over soft noodles and topped with a creamy, buttery sauce are the perfect complete meal – all from one pot.

    I think this dish qualifies for both festive entertaining and stay-at-home comfort food. The soft noodles covered with the rich, creamy sauce and tender chicken are down-right delicious.

    owner of Glory Kitchen

    instagram
    facebook

    Cranberry Chicken

    4-6 servings

    Ingredients

    • Mumbai nut & spice mix
    • 4-6 boneless chicken breasts
    • olive oil
    • 1½ cup fresh orange juice
    • ¼ cup apple cider vinegar
    • ¼ cup maple syrup
    • ½ -1 cup chicken stock
    • ½ teaspoon salt
    • 4-6 sage leaves, fresh, chopped
    • 1½-2 cups fresh cranberries, depending upon taste
    • 1 cup half and half milk
    • 2 tablespoons butter
    • 1 bag noodles; wide egg noodles, fusilli, or other type of noodle

    Instructions

    1. Preheat the oven to 325°.
    2. Season each side of the chicken breasts with a bit of salt & let them come to room temperature. Using a dutch oven or a heavy large pot with a lid, heat about 1 tablespoon of olive oil on the stovetop and then add the chicken, letting it sit for a while so it browns nicely without being overworked. Turn the chicken breasts and brown the opposite side. Remove these breasts to a plate and brown the remaining pieces until all breasts are well browned on both sides. Add all chicken breasts back to the dutch oven.
    3. In a large mixing bowl, whisk together orange juice, 1 tablespoon olive oil, cider vinegar, maple syrup, chicken stock, salt, chopped sage leaves, and 1 tablespoon of Mumbai nut & spice mix. Stir in the fresh cranberries then pour this mixture over the chicken breasts in the large pot. Cover with the lid and place in the oven to cook for 1 hour. After 1 hour, check the pot to make certain the chicken is fully cooked and tender.
    4. When the chicken is tender and ready, remove the breasts from the pot and stir into the cranberry sauce, 2 tablespoons of butter and 1 cup of half and half milk. Stir the mixture until the butter is melted and the milk is well incorporated. Taste the sauce and adjust the seasonings, adding more salt if needed. Often I will add more chicken stock to make certain there is plenty of yummy sauce to coat the noodles and chicken when serving.
    5. Add the chicken breasts back into the sauce and place the pot back into the oven for 10 more minutes.
    6. While the chicken is in the oven, make the noodles, according to package directions, and keep them ready for serving. To serve, add noodles to the base of a shallow bowl or plate, top with a breast of chicken and ladle the sauce over the entire dish. Finish the dish with additional Mumbai nut & spice mix and fresh herbs or thinly sliced scallions.

    Notes

    This chicken dish would also work well with Cairo, Penang and Provence blend, however, I love the pungent Indian flavors in the Mumbai blend.

    Cranberry Chicken - Glory Kitchen
    Cranberry Chicken - Glory Kitchen
    Cranberry Chicken - Glory Kitchen
    Cranberry Chicken - Glory Kitchen
    Cranberry Chicken - Glory Kitchen
    Cranberry Chicken - Glory Kitchen
    Cranberry Chicken - Glory Kitchen
    Cranberry Chicken - Glory Kitchen
    Cranberry Chicken - Glory Kitchen
  • GOAT CHEESE TRUFFLES

    Serving these little bite-sized goat cheese truffles crusted with nuts, herbs and spices is such a nice surprise combination of creamy tangy cheese, and crunchy nut flavor.  I was first introduced to the idea of making goat cheese truffles by the talented California duo,  Canyon Girls Catering, who serve these on their event cheese trays.  These little balls of goodness are simple and quick to make yet can be elegantly presented as an appetizer alongside a glass of wine and some crusty bread.

    The truffles can be made using any of our 6 blends of Glory Kitchen nut & spice mixes, stacked up and served on their own, or can be included as part of an elaborate cheese tray.  Each variety of cheese truffle offers a unique bite of spice, crunch and creamy flavor.  They are fun to present and even more fun for guests to sample the different varieties.

    Chévre is the french term for goat cheese and is obviously made from goat’s milk. It has a tart, tangy flavor and a lower fat content than cheese made from cow’s milk. As it ages, it becomes more robust and bolder in flavor.

    Most goat cheese originates from France and in addition to Chévre, other varieties include Chabis & Boucheron.  The next time you offer to bring an appetizer for a gathering of friends, bring an assortment of these flavorful cheese truffles for something unique and interesting.

    Margie Bruner
    owner of Glory Kitchen

    instagram
    facebook

    Goat Cheese Truffles

    Ingredients

    Instructions

    1. Bring the goat cheese to room temperature. Take a small spoonful of cheese, and with your hands, roll it into a small but compact ball. Take any of the Glory Kitchen nut & spice mixes and spread some out onto a small, flat plate. Roll the goat cheese ball into the nut blend until it is completely covered on all sides. Once all of your cheese truffles are finished, refrigerate to set and then serve cool or at room temperature alongside crackers or slices of crusty bread.

    Notes

    These little truffles are a great addition to a festive cheese tray or are quite special on their own served with a side of good bread and a glass of wine.

    Penang Asian nut & spice mix - Glory Kitchen
    Goat Cheese Truffles - Glory Kitchen
    Goat Cheese Truffles - Glory Kitchen
  • PERSIMMON AND WILD RICE SALAD

    I love a salad that has meaty, nutty flavors and is very filling – in a good way.  This salad has the nutty flavors of walnuts and wild rice, tang from gorgeous winter persimmons and apples, sweet chewiness from golden raisins and French herb flavors from Provence nut & spice mix.  Underneath all these fresh beauties lies a bed of kale and chopped baby spinach tossed with a homemade french vinaigrette, which by the way, is so easy to make.

    I’ve recently discovered the bright, sweet flavors of a persimmon, a winter fruit which adds so much color and flavor to dishes.  Raw, roasted or sauteed, they infuse a unique and tangy sweetness to salads, are a great base for jams & jellies, perfect for toppings on crostini or toast, brighten up cheeses and the list goes on.

    Persimmons are of Asian origin, mostly China & Japan, and grow on trees much like apples.  They are not thought to be berries, however, much like the tomato, botanically speaking the Persimmon fruit is in fact a berry. I made this salad as our main dish for lunch and it delivered both on flavor and satisfaction.

    Margie Bruner - Glory Kitchen

    Margie Bruner
    owner of Glory Kitchen

    instagram
    facebook

    Persimmon and Wild Rice Salad

    Yield: 4-6 servings

    Ingredients

      For the salad:
    • Provence nut & spice mix
    • 1-2 persimmon
    • 1-2 red apple, any tart variety
    • 1/3 cup golden raisins
    • 1½-2 cups wild rice
    • ¾ cup walnuts, toasted
    • 4 oz. baby spinach
    • 1 bunch kale, ribs removed
    • french vinaigrette dressing
    • For the french vinaigrette dressing:
    • ¼ cup balsamic vinegar
    • ½ cup extra virgin olive oil
    • 2 teaspoons Provence nut & spice mix
    • 2 teaspoons dijon mustard
    • 1 tablespoon honey
    • pinch of pepper
    • good pinch of salt

    Instructions

    1. Mix together all the ingredients for the french vinaigrette dressing, except the olive oil. Whisk until well incorporated and then slowly drizzle in the olive oil, whisking as you go until the dressing is completely emulsified. Set aside.
    2. Make the wild rice (as directed on the package) by using chicken stock, vegetable stock or salty water. Cook well, almost over steam the rice but keeping it moist and tender, then set aside to cool.
    3. Lightly toast the walnuts in a hot pan over the stovetop (do not burn) and set aside. I like to keep them in large chunks and actually leave some pieces whole.
    4. Cut the kale into small pieces, removing the tough center stems. Slightly chop the spinach into large bite-sized pieces. In a large bowl, toss the greens and about 1 cup of wild rice with some of the french vinaigrette dressing, massaging well into the lettuces & rice, then place a good amount into each serving bowl.
    5. Top each salad bowl with an arrangement (see photo) of sliced, fresh persimmons, sliced apples, golden raisins, a bit more wild rice and toasted walnuts. Sprinkle the sliced fruits with Provence nut & spice mix and serve. Place more dressing on the serving table to add additional as desired.

    Notes

    Provence nut & spice mix is a crunchy and mild mix of chopped cashews and typical french herbs which include marjoram, savory, basil and thyme and together they enhance the vinaigrette dressing, however, if you want to add more spunky flavor, Cairo, Mumbai, San Miguel and Penang nut & spice mixes would work beautifully as well. Add these into the dressing instead of the Provence blend and sprinkle more nut & spice mix on top of the salad just before serving.

    Persimmon and Wild Rice Salad - Glory Kitchen
    Persimmon & Wild Rice Salad - Glory Kitchen
    Persimmon and Wild Rice Salad - Glory Kitchen
    Persimmon & Wild Rice Salad - Glory Kitchen
    Persimmon and Wild Rice Salad - Glory Kitchen
    French Vinaigrette Dressing - Glory Kitchen
    Persimmon & Wild Rice Salad - Glory Kitchen
    Persimmon and Wild Rice Salad - Glory Kitchen
  • CHILI SPICED CAULIFLOWER

    The savory, spicy & crunchy flavors of this chili spiced cauliflower have made this a quick go-to dish I make over and over.  Making cauliflower in this way is just so tasty, you won’t even remember you’re making a vegetable.  The added crunch and smokiness from Glory Kitchen’s San Miguel nut & spice mix will season this veggie in such a lovely way.

    Cauliflower, a cruciferous vegetable, is in the same family as cabbage, kale & broccoli.  The large, bulbous and flowery head is called a “curd” and it is in peak season during the winter months between December and March.

    Cauliflower can become transformed when roasted with smoky chili flavors.  By adding the crunch of pepitas (pumpkin seeds) and the smokiness of ancho chilis, chipotle pepper and paprika, these little florets become melt-in-your-mouth irresistible.

    Margie Bruner - Glory Kitchen

    Margie Bruner
    owner of Glory Kitchen

    instagram
    facebook

    Chili Spiced Cauliflower

    Yield: 4 servings

    Ingredients

    • 1 tablespoon San Miguel nut & spice mix
    • 1 large head of cauliflower
    • 1 tablespoon extra virgin olive oil
    • 1 teaspoon smoked paprika
    • sea salt

    Instructions

    1. Preheat the oven to 400° and place the rack in the center of the oven.
    2. Cut the head of cauliflower into four quarters and then cut each quarter into small florets, making certain to carefully cut out the center stem. Layer the small cauliflower florets onto a baking sheet lined with either foil or parchment paper.
    3. Drizzle the florets with olive oil. Sprinkle with paprika, a generous pinch of sea salt & San Miguel nut & spice mix. Using your hands, gently toss the cauliflower until they are all completely covered with spices and oil. Distribute the florets evenly onto baking sheet and place the sheet into the hot oven.
    4. Roast the cauliflower for 20-30 minutes or until golden and slightly browned. Test the readiness by piercing a few florets with a fork to make certain they are soft & tender. Remove and serve warm.

    Notes

    This roasted cauliflower would also be delicious using Mumbai, Umbria, Cairo, Penang or Provence nut & spice mixes from Glory Kitchen.

    Chili Spiced Cauliflower - Glory Kitchen
    Chili Spiced Cauliflower - Glory Kitchen
    Chili Spiced Cauliflower - Glory Kitchen
    Chili Spiced Cauliflower - Glory Kitchen
    Chili Spiced Cauliflower - Glory Kitchen
    Chili Spiced Cauliflower - Glory Kitchen
  • THANKSGIVING SQUASH CASSEROLE

    I like to change up the menu a bit each Thanksgiving just to keep things interesting, however, there is one exception – it is never a true Thanksgiving without serving this squash casserole. It is my boys’ very favorite and they ask for it every year.

    Using both yellow squash and zucchini, it is prepared in a rather rustic manner. After making it over and over for many years, I actually prefer to make it without following the exact details of the recipe.  Once I gather the ingredients and review their proportions, the process just becomes a bit of this, and a bit of that.  It may turn out slightly different each time but it always gives that wonderful, satisfying casserole feeling – just plain squash goodness.

    And because it is made mostly of veggies, you don’t feel guilty going back for seconds or thirds.  The only problem is we rarely have leftovers.  I hope this simple squash casserole becomes one of your family favorites too.  Enjoy!

    Margie Bruner
    owner of Glory Kitchen

    instagram
    facebook

    Thanksgiving Squash Casserole

    Yield: 8-10 servings

    Ingredients

    • Cairo nut & spice mix
    • 3-4 yellow squash, sliced
    • 6-8 zucchini squash, sliced
    • 1-2 large sweet yellow onions, chopped
    • 4 garlic cloves, minced
    • 2 tablespoons olive oil
    • 3 eggs, whisked
    • 1 cup panko bread crumbs
    • 2 pinches sugar
    • 2 teaspoons salt
    • ½ teaspoon pepper
    • ¾ cup shredded parmesan cheese

    Instructions

    1. Pre-heat oven to 350°. Prep & slice all the veggies. Chop the onion in a large, loose chop & set aside. Chop both the yellow squash & zucchini & set aside in a large bowl (I like to cut these in circles, rather rustically). Chop the garlic and set aside.
    2. In a separate bowl, measure out ½ cup of the panko bread crumbs (feel free to use regular bread crumbs, but not seasoned), add ¼ cup parmesan cheese, add 1 tablespoon of Cairo nut & spice mix, add 1 tablespoon olive oil. Using your hands, massage this mixture until it is well combined. This will be your bread crumb topping which goes on last. Set aside.
    3. In a large pot, sauté onion in 1 tablespoon olive oil until wilted and slightly brown. Add chopped garlic and brown both for about 3 minutes. Add both squashes, salt, pepper & pinch of sugar. Cook over a med - high heat until the veggies are slightly tender (keep them a bit firm because they will cook more in the oven). Remove from heat and let the squash cool.
    4. When slightly cooled, drain the excess liquid from squash in a colander. Pour the squash back into the large pot & mix in the whisked eggs, ½ cup bread crumbs and ½ cup parmesan cheese. Pour the entire squash mixture into a buttered 9 x 13 casserole dish. Cover with foil and place into a 350° oven for 30 minutes.
    5. After 30 minutes, remove the foil, top with the panko/parmesan/Cairo mixture and bake another 10-15 minutes or until the topping is lightly browned and toasted. Remove from oven and serve. *Can be prepared the day before and refrigerated. I would not bake until the day it is served and leave off the panko topping. Add the bread crumb topping the last 15 minutes of cooking - this will keep your topping nice and crunchy.

    Thanksgiving Squash Casserole - Glory Kitchen
    Thanksgiving Squash Casserole - Glory Kitchen
    Thanksgiving Squash Casserole - Glory Kitchen
    Thanksgiving Squash Casserole - Glory Kitchen
    Thanksgiving Squash Casserole - Glory Kitchen
    Thanksgiving Squash Casserole - Glory Kitchen
    Thanksgiving Squash Casserole - Glory Kitchen
    Thanksgiving Squash Casserole - Glory Kitchen
  • HARICOTS VERTS WITH CASHEWS

    I’m a big believer in keeping the green bean crisp and simple.  Just a bit of steaming, tossed in an herby lemon butter and served with a slightly toasted nut.

    Sometimes veggies should be treated very simply so the true flavor can shine.  These haricots verts, a french term for the slender, younger version of the green bean, are still crisp and are lightly tossed with Provence nut & spice mix, french herbs and flavors from Glory Kitchen.

    I’ll be serving these gorgeous, crisp green beans at our Thanksgiving table to pair with all the other casseroles and goodies – a bright green option that is fresh, simple and delicious.

    Margie Bruner
    owner of Glory Kitchen

    instagram
    facebook

    Haricots Verts with Cashews

    Yield: 10-12 servings

    Ingredients

    • Provence nut & spice mix
    • 2 lbs haricots verts or green beans
    • 10 oz raw cashews, whole
    • 3 tablespoons butter, unsalted
    • 1 lemon, juice and zest
    • 1 tablespoon olive oil
    • sea salt

    Instructions

    1. Rinse & trim haricots verts or green beans. I like to snip the side connected to the stem but leave the pretty tip intact, particularly if it is a slender haricots verts. Fill a large stock pot, with lid, half full with well-salted water and bring to a boil. Place the beans into the boiling water, cover, bring back to a boil, and cook for 5-7 minutes or until bright green but still crisp. Keep watch and do not over boil. Drain the beans into a colander and run cold water over them or place them in an ice bath to shock and cool them down quickly - this helps retain the bright green color and keeps them crisp. Set aside and allow these to drain.
    2. In the same stock pot (dry completely before re-using), heat the pan and then add the raw cashews. Allow to toast tossing gently and then quickly remove them from the pot and set aside.
    3. Again using the same stock pot, melt the butter, add the olive oil, the lemon zest and a squeeze of lemon juice, add the Provence nut & spice mix a generous sprinkle of sea salt and the toasted cashews which have been set aside. When all are combined and melded, add the haricots verts, remove the pot from the heat and turn the beans gently to coat with the oils and herbs.
    4. Place the beans on a serving platter and top with the remaining cashews, herbs and a good squeeze of lemon juice.

    Notes

    These can be made ahead, refrigerated and heated just before serving.

    Haricots Verts with Cashews - Glory Kitchen
    Haricots Verts with Cashews - Glory Kitchen
    Haricots Verts with Cashews - Glory Kitchen
    Haricots Verts with Cashews - Glory Kitchen
    Haricots Verts with Cashews - Glory Kitchen
    Haricots Verts with Cashews - Glory Kitchen
    Haricots Verts with Cashews - Glory Kitchen
    Haricots Verts with Cashews - Glory Kitchen
  • SMOKY ROASTED TOMATO SOUP WITH GRUYERE AND UMBRIA CROSTINI

    This tomato soup is elevated by roasting tomatoes to create wonderful caramelization.  Melissa Wright is sharing her favorite family soup recipe…

    Melissa Wright
    mother, physician and food blogger
    instagram: @wrightfamilytable
    website: www.wrightfamilytable.com

    I first started making soup with roasted tomatoes a few years ago, and I haven’t looked back since. Tomato soup is the ultimate comfort food for cold and drizzly days, and the smell of vegetables slowly caramelizing in the oven filling the kitchen is an added bonus.

    This spiced version is a new favorite in our home. The smoked paprika and Umbria from Glory Kitchen pair together to create a fuller flavor that balances out the sweetness brought by roasting the vegetables. If you have always loved the classic combo of grilled cheese and tomato soup, then you will love this grown-up version.   (food and photos created by Melissa)

    Smoky Roasted Tomato Soup with Gruyere & Umbria Crostini

    serves 8

    Ingredients

      For the soup:
    • 2 teaspoons UMBRIA nut & spice mix
    • 3 lbs fresh tomatoes (mix of cherry, vine, plum, etc.)*
    • 2 small yellow onions, sliced
    • 6 cloves garlic, peeled
    • ½ cup extra virgin olive oil
    • 2 teaspoons smoked paprika
    • salt and freshly ground pepper, to taste
    • 3 cups chicken stock
    • *fresh tomatoes can be substituted with 42 ounces of canned tomatoes. Drain tomatoes before using.
    • For the crostini:
    • 1 tablespoon UMBRIA nut & spice mix
    • 1 heaping cup finely grated gruyere cheese
    • 1 baguette, sliced

    Instructions

    1. Preheat oven to 450°. Line a baking sheet with parchment.
    2. Wash tomatoes. Core, deseed, and cut the tomatoes into halves (cherry tomatoes can remain whole). Spread tomatoes, garlic, and onions onto prepared baking sheet. In a small bowl, stir together the olive oil, 2 teaspoons Umbria, and smoked paprika. Pour over tomatoes, garlic, and onions. Gently stir to coat, then season with salt and pepper. Roast in preheated oven for 25-30 minutes, until vegetables are soft and beginning to brown in places.
    3. Place roasted tomatoes, onions, and garlic and any juices from the pan into a large stockpot. Add chicken stock. In batches, place mixture into a blender and blend until very smooth. Return to stockpot and place over medium heat. Let simmer until slightly reduced and thickened, about 10-15 minutes. Season with additional salt and pepper, if needed.
    4. While soup thickens, make the crostini. Preheat the oven broiler. Stir gruyere and the 1 tablespoon Umbria together in a bowl. Place crostini slices on a baking sheet. Toast slices in preheated oven until just beginning to become golden on the edges, about 1-2 min per side. Remove from oven, and top with spice and cheese mix. Place back in the oven, and broil until cheese is melted and bubbling, about 1 more minute.
    5. Serve soup warm with crostini.

    Smoky Roasted Tomato Soup
    Smoky Roasted Tomato Soup
    Smoky Roasted Tomato Soup
Updating…
  • No products in the cart.

JOIN US !
JOIN
close-link