• Okra Dippers - Glory Kitchen

    OKRA DIPPERS

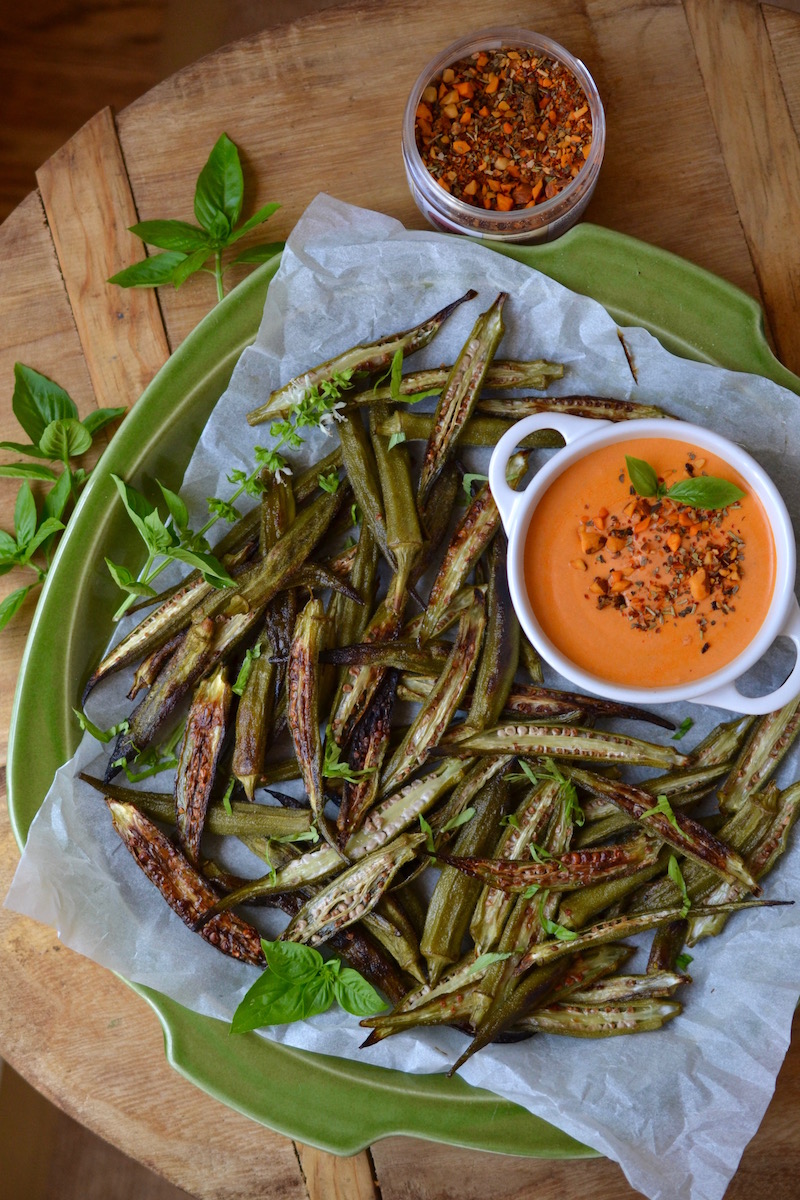
    This is for all of the savory, salty, chip and dip lovers.  These Okra Dippers are as tasty and satisfying as any of your favorite snacks but they are good-for-you!  These little green dippers are addictive and oh so delicious.  Roasted and crisped-up okra paired with a creamy red pepper dipping sauce is the perfect appetizer to serve to guests at an outdoor garden party.  They taste sinful but actually healthy,

    The Italian style dip made with our Umbria nut & spice mix and served alongside the okra adds a great red color contrast to the beautiful green veggies.  Wait until you taste these little bites, they’re difficult to stop eating.

    With only 4 ingredients, the red pepper dipping sauce is quick and simple to make but has amazing tang and flavor.

    Although it is great paired with okra it could also be used on so many more foods.  It would make a great dip on a crudité platter alongside lots of colorful raw veggies.  It would be delicious on a wrap or as a sandwich spread, and it would work well as a creamy dressing on an iceberg lettuce wedge.  Of course a side bowl of crispy pita chips would also make this dip disappear in no time.

    In about 20 minutes (and most of that is cooking time) you can have a terrific snack or appetizer for guests.  Enjoy!

    Margie Bruner
    owner of Glory Kitchen

    instagram
    facebook

    Okra Dippers

    Ingredients

      For the dip:
    • 1 tablespoon Umbria nut & spice mix
    • 3/4 cup mascarpone cheese
    • 3/4 cup greek yogurt, plain
    • 1 1/2 -2 roasted red peppers, jarred
    • pinch of sea salt
    • For the okra:
    • 2 lbs fresh okra
    • 1 tablespoon olive oil
    • pinch of sea salt
    • fresh basil, julienned, for presentation

    Instructions

      for the dip:
    1. Mix together in a blender mascarpone cheese, greek yogurt, red pepper (depending upon how large they are in the jar, use 1 1/2 or 2 peppers), 1 tablespoon Umbria nut & spice mix and a pinch of salt. Blend until smooth, pour into a serving bowl and set aside.
    2. for the okra:
    3. Set the oven to 425°. Slice each okra lengthwise, place them all onto a baking tray and drizzle them with olive oil. Sprinkle with a pinch of salt and then using your hands, toss them gently so the oil is distributed on all the okra. Spread the veggies evenly so they have room to bake.
    4. Bake in the oven for about 20 minutes, or until they are nicely browned. The more you bake them, the crispier they get, but don't overcook them because they burn quickly. Remove from the heat and allow them to cool to room temperature.
    5. Arrange the okra onto a serving tray and place the red pepper dipping sauce beside it. Sprinkle the okra with a bit of fresh basil. Sprinkle the top of the dipping sauce with a bit of Umbria nut & spice mix. Enjoy!

    Okra Dippers - Glory Kitchen
    Okra Dippers - Glory Kitchen
    Okra Dippers - Glory Kitchen
    Okra Dippers - Glory Kitchen
    Okra Dippers - Glory Kitchen
  • ROASTED RED PEPPER AND CUCUMBER SALAD

    This is a must-make Roasted Red Pepper and Cucumber Salad, especially in the summer when peppers, cucumbers and tomatoes are overflowing in the farmer’s markets.

    Sweet, and robust flavored tomatoes are best when treated in a simple manner.  Red peppers sweeten and intensify in flavor when they are caramelized in the oven, and fully ripened cucumbers are typically perfect left just the way they are.  If you’re working with an English cucumber, which is typically thinner skinned and has fewer seeds than a conventional cucumber, a simple peel and slice is  all that is needed to retain its crisp, fresh flavor.  With a no-cook approach, tossing all these perfect summer vegetables with a light dressing and some fresh herbs allows the flavors of summer to shine.

    I’ve finished this salad off with some thick shaves of parmigiano reggiano cheese, slivers of fresh basil, and lots of  Umbria nut & spice mix for a touch of almond crunch and aleppo pepper heat.  This is a fresh and tangy salad with nice crunch and can be served as a side dish or a full meal.

    Of course you could always top this Roasted Red Pepper and Cucumber Salad with some swirls of thinly sliced prosciutto, an Italian dry-cured ham, to make it a beautiful main dish.

    And finally, if you want to give this same salad recipe a Greek twist, you could replace the parmigiano reggiano with feta and instead top it with fresh torn mint leaves and our Glory Kitchen Cairo nut & spice mix… this might be my next salad to make.  Enjoy!

    Margie Bruner - Glory Kitchen

    Margie Bruner
    owner of Glory Kitchen

    instagram
    facebook

    Roasted Red Pepper and Cucumber Salad

    serves about 4

    Ingredients

      For the pickled red onions:
    • 1 cup apple cider vinegar
    • 2 tablespoons sugar
    • 3 teaspoons salt
    • 1 red onion, sliced thin
    • For the salad:
    • Umbria nut & spice mix
    • 2 red bell peppers, roasted
    • 1 english cucumber
    • ½ lb grape or cherry tomatoes
    • ½ cup kalamata olives
    • 1 cup pickled red onions (recipe ingredients above)
    • 3 teaspoons olive oil
    • 3 teaspoons brine from pickled onions
    • 4-6 fresh basil leaves, julienned
    • parmigiano reggiano cheese, small block

    Instructions

      for the pickled onions:
    1. Using a small saucepan, combine the apple vinegar, sugar, and salt. Bring to a low boil and then reduce the heat, stirring until the sugar and salt dissolve. Remove from heat and allow the brine to cool a bit. In a bowl, pour the cooled brine over the thinly sliced red onions and set them aside to marinate & pickle for about ½ hour to 1 hour.
    2. for the salad:
    3. Slice each red bell pepper in half, lay them on a baking tray, drizzle with olive oil, sea salt and Umbria nut & spice mix. Place into a pre-heated 400° oven and roast them until they are tender and browned. Remove from oven, cool and then slice each pepper. Set aside. For this recipe I used about 20 mini peppers (red, orange and yellow) instead of large red bell peppers.
    4. Peel the English cucumber just a bit (see photo) and then slice in half, lengthwise. Cut the halves into half rounds (bite sized pieces) and set aside.
    5. Slice each small tomato in half and set aside.
    6. Slice each kalamata olive in half and set aside.
    7. Using a large mixing bowl, add roasted red peppers, sliced cucumbers, sliced tomatoes, sliced olives, pickled red onions, olive oil, 3 teaspoons of pickling brine, 2 heaping teaspoons of Umbria nut & spice mix, and the julienned basil. Gently mix together to combine.
    8. Place the salad onto a large serving platter or onto 4 individual serving plates. Garnish with Umbria nut & spice mix, fresh basil and thick shaves of parmigiana reggiano cheese. Serve immediately.

    Red Pepper and Cucumber Salad - Glory Kitchen
    Roasted Red Pepper and Cucumber Salad - Glory Kitchen
    Roasted Red Pepper and Cucumber Salad - Glory Kitchen
    Roasted Red Pepper and Cucumber Salad - Glory Kitchen
  • ENGLISH PEA AND ORZO SALAD

    This English Pea and Orzo Salad is the perfect way to ring in summer flavors .  Adding small shrimp or chopped hard boiled egg could easily turn it into a full meal or it would also work well as a side dish for a barbeque or picnic.  I love all the pretty little round ingredients: peas, capers, cherry tomatoes, and tiny little orzo pasta.  Prepping and chopping the ingredients for the salad was almost as enjoyable as eating it, so enjoy the entire process!

    When rounding up my ingredients at the grocery store, I tried to focus on yellow and green colorations.  Remember, we eat with our eyes first, so the presentation of your meal can be the first step in truly enjoying a dish. I’ve added the Italian flavors of our Umbria nut & spice mix into this dish which gave it a subtle crunch of almonds and the robust taste of sun dried tomatoes.

    This salad is dressed with simple ingredients – olive oil, fresh lemon juice, and fresh herbs, giving it a bright and clean flavor.  I hope you enjoy this delightful salad as much as we did.

    Margie Bruner
    owner of Glory Kitchen

    instagram
    facebook

    English Pea and Orzo Salad

    Yield: serves 4

    Ingredients

      For the dressing:
    • 1 teaspoon Umbria nut & spice mix
    • 1 lemon, fresh (about 2 tablespoons)
    • 3 tablespoons olive oil
    • 1 tablespoon mayonnaise
    • 1 pinch salt
    • 3 pinches sugar
    • For the salad:
    • Umbria nut & spice mix
    • 3 cups orzo pasta, cooked
    • 1 ½ cups english peas, fresh
    • 2-3 yellow bell peppers (or 20 mini bell peppers)
    • 1 cup yellow cherry tomatoes
    • 2 tablespoons shallots, sliced thin
    • 1 ½ tablespoons capers, drained
    • 8 oz. feta cheese
    • ¼ cup flat leaf parsley, fresh
    • 5-7 basil, fresh
    • 2 tablespoons thyme, fresh

    Instructions

      For the dressing:
    1. Whisk together all the ingredients for the dressing and set aside. (One fresh squeezed lemon should be equivalent to about 2 tablespoons)
    2. For the salad:
    3. Preheat the oven to 400-425°. If you are using full sized yellow bell peppers, slice each one in half. Place on a baking sheet, drizzle them with a bit of olive oil and rub all over. Sprinkle with salt and a generous amount of Umbria nut & spice mix. Instead of large yellow bell peppers, I used 20 mini yellow bell peppers and roasted them whole. Roast the peppers in the oven until they are, soft, brown and a bit caramelized. Remove from the oven and allow them to cool completely. Take the cooled peppers and remove stems & seeds (the minis did not need seed removal), slice them into small pieces (see photo) and set these aside in a bowl.
    4. Boil the orzo pasta until it is al dente. Drain & rinse, then pour into a bowl and toss with a drizzle of olive oil to prevent the small pasta from sticking together. (1 ¼ cup of uncooked orzo pasta yielded me about 3 cups of cooked orzo)
    5. Pour the fresh peas into a pot of boiling water and boil for only 1 minute, or until it is bright green. Remove from heat quickly, rinse with cool water, drain and set the peas aside to cool completely.
    6. Slice the tomatoes in half if they are very small. If a bit larger, slice into quarters then set aside in a bowl.
    7. Slice the shallots very thin. Chop the parsley, basil and thyme, place all the herbs into a bowl and set aside. Set aside a few whole leaves of herbs to use for garnish on top of each serving.
    8. In a large mixing bowl, combine the cooled orzo pasta, peas, yellow bell peppers, yellow tomatoes, shallots, herbs and the drained capers. Pour the lemon dressing into the salad and toss it gently but thoroughly. Pour into bowls or plates to serve individually, or if serving buffet style, arrange the salad onto a large platter. Top the salad with crumbles of feta cheese, sprinkles of Umbria nut blend, and finally fresh herb leaves for garnish.

    English Pea and Orzo Salad - Glory Kitchen
    English Pea and Orzo Salad - Glory Kitchen
    English Pea and Orzo Salad - Glory Kitchen
    English Pea and Orzo Salad - Glory Kitchen
    English Pea and Orzo Salad - Glory Kitchen
    English Pea and Orzo Salad - Glory Kitchen
  • LEMON AND ASPARAGUS PASTA

    This Lemon and Asparagus Pasta recipe yields a bright, fresh bowl of springtime goodness.  Asparagus, white wine, and fresh lemons always say spring to me and they’re welcomed flavors after the heavy winter dishes that helped keep us warm and cozy in the cold weather.  

    The bright flavors of lemon juice and freshly grated lemon rind add a crispness   while the presentation is pretty and inviting.  With only a few ingredients, some patience to shred the asparagus and a quick sauté in a hot pan, this dish can be made quickly and inexpensively.   The flavors are refreshing and delicious; a perfect meal to welcome warmer weather, springtime blossoms, and new beginnings.

    I often create recipes according to my mood or by what looks fresh and seasonal at the market.  As a result, the process often involves a little of this and that, so as you are tossing in all the fresh goodness, don’t be shy about adding a bit more wine or chicken stock for moisture, more Umbria blend for crunch, or more seasoning to your own personal liking.

    In addition, although I usually try to cook with a “healthy” type of pasta such as 100% whole wheat, brown rice flour or a 100% quinoa pasta, for purposes of this recipe post I used a semolina spaghetti pasta because it makes for a prettier photograph!  Happy spring.

    Margie Bruner
    owner of Glory Kitchen

    instagram
    facebook

    Lemon and Asparagus Pasta

    Yield: serves 4

    Ingredients

    • 1 tablespoon Umbria nut & spice mix
    • 1 bunch fresh asparagus
    • 8-10 ounces spaghetti pasta
    • ½ - ¾ cup white wine
    • 2 tablespoons unsalted butter
    • 3 tablespoons olive oil
    • 2 teaspoons finely grated lemon zest
    • 3 tablespoons fresh lemon juice
    • sea salt
    • fresh parmesan cheese

    Instructions

    1. After washing and drying asparagus, cut the tip off each stalk (about 2 inches) and set aside in a bowl. Take the remaining stalk and using a vegetable peeler, make long shreds of the entire stalk until you cannot peel any more. If there is a thick strand leftover, slice it lengthwise to make it thinner, much like the other strands. This takes a bit of patience. 🙂 After shredding all the stalks, set these aside in a large bowl.
    2. Cook the spaghetti noodles in a large stock pot of very salted, boiling water until it is al dente and not overly cooked. Drain the noodles and set these aside in a large bowl with a slight drizzle of olive oil tossed in so they do not stick to one another as they cool.
    3. Using the same stock pot from the noodles, heat 1 tablespoon of olive oil and toss in the asparagus tips which were set aside earlier. Add a pinch of salt and toss gently just until they are bright green but still crisp (less than one minute if the oil is hot). Remove from heat and set aside in a bowl.
    4. To the same pot, add the 2 tablespoons butter, 2 tablespoons olive oil and a generous pinch of salt. Add in the shredded asparagus and toss gently as they begin to wilt and soften. Don't over cook them, it goes quickly. Add in the wine, the Umbria nut & spice mix, and the fresh lemon juice. Add the spaghetti noodles. Toss gently until the asparagus and noodles are incorporated then serve the pasta in individual serving bowls. Top and garnish each serving with asparagus tips, grated lemon rind, more Umbria blend, and large shreds of fresh parmesan cheese. Use a vegetable peeler on a block of cheese to yield large shaved slices. Serve immediately.

    Lemon and Asparagus Pasta - Glory Kitchen
    Lemon and Asparagus Pasta - Glory Kitchen
    Lemon and Asparagus Pasta - Glory Kitchen
    Lemon and Asparagus Pasta - Glory Kitchen
    Lemon and Asparagus Pasta - Glory Kitchen
    Lemon and Asparagus Pasta - Glory Kitchen
    Lemon and Asparagus Pasta - Glory Kitchen
  • SICILIAN CHICKEN STEW

    Patti Conciatori is a wonderful cook and after marrying into an Italian family she came to master the art of Italian cooking.  As a mother of three college-aged girls, Patti often has a house full of family & friends.  She entertain crowds in a warm, welcoming, and relaxed style in both her Cape Cod and Darien, Connecticut homes. I asked Patti to share one of her favorite family dishes – a Sicilian chicken dish which doesn’t disappoint. -Margie

    Patti Conciatori
    wife, mother, and home cook

    I often tweak recipes based on personal tastes and what I have in my house, which is what I’ve done with this delicious and hearty Sicilian Chicken Stew recipe adapted from Mario Batali.  It is a perfect slow cooked meal on a cold night and it makes enough to feed a crowd.  The cook time may seem lengthy, but the longer it cooks the more flavor and richer the taste.  All you need to add is some crunchy Umbria mix on top, a side salad, and some good bread to scoop up every last bite.

    I love to cook simple delicious meals and am thrilled that my three college-aged daughters are finally asking for my recipes!

    Sicilian Chicken

    8 servings

    Ingredients

    • Umbria nut & spice mix
    • 16 pieces of chicken – mostly skinless boneless thighs and two skinless, boneless breasts cut in half
    • Coarse salt and freshly ground pepper
    • 8 tablespoons extra-virgin olive oil, plus extra for drizzling
    • 4 medium russet potatoes, unpeeled, cut in chunks
    • 1 large eggplant, cut in large cubes
    • 4 green bell peppers, cored, seeded and diced into very small pieces
    • 6 medium carrots, sliced into ½ inch rounds
    • 6 plum tomatoes, cut in chunks
    • 1 cup of Sicilian olives
    • 4 tablespoons of salt-packed capers, rinsed
    • 1 bottle of red wine
    • 6 tablespoons chopped fresh mint
    • 6 tablespoons chopped fresh flat-leaf parsley
    • Pinch of hot red pepper flakes

    Instructions

    1. Preheat oven to 350°.
    2. Season chicken pieces with salt and pepper. In a large Dutch oven, heat olive oil over medium-high heat until hot but not smoking. Add chicken pieces in batches and brown on both sides. Transfer to a plate and set aside.
    3. In same pan, combine potatoes, peppers, eggplant, carrots, tomatoes, olives and capers and cook until softened, but not browned, about 8 – 10 minutes. Season with salt and pepper. Add all the wine and return chicken to the pot and bring to a boil.
    4. Cover Dutch oven and put in oven at 350° for 2 ½ hours. Uncover and leave in warm oven for 2 hours. Turn oven up to 200° and reheat an hour before serving.
    5. Stir in half the mint and parsley. Transfer stew to large serving dish. Top with remaining mint and parsley, Umbria nut & spice mix and drizzle with olive oil. Serve!

    Notes

    from Margie: When I recently made this dish I reduced the size to half since it was just a meal for my husband and me. Even doing so, I found I needed to transfer my ingredients into a large stock pot because they would not fit into my cast iron dutch oven. So use a large pot, and if you are making the entire recipe, use the largest one you have. You'll be glad the recipe yields a lot because it is just SO good!

    Sicilian Chicken Stew - Glory Kitchen
    Sicilian Chicken Stew - Glory Kitchen
    Sicilian Chicken Stew - Glory Kitchen
    Sicilian Chicken Stew - Glory Kitchen
    Sicilian Chicken Stew - Glory Kitchen
    Sicilian Chicken Stew - Glory Kitchen
    Sicilian Chicken Stew - Glory Kitchen
    Sicilian Chicken Stew - Glory Kitchen
  • RUSSET AND SWEET POTATO FRIES WITH HOMEMADE KETCHUP

    Fresh chopped rosemary and generous sprinkles of Umbria nut & spice mix can add amazing flavor to all types of potatoes.  In this recipe I’ve used two types – russet potatoes & sweet potatoes; both offer different flavors that mix together so well.  Toss them in a bit of olive oil, sea salt, fresh chopped rosemary and sprinkle with crunchy Umbria nut & spice mix to make amazing tasting (and healthy!) french fries.

    I like to keep the skins on for added nutrients and for a rustic and homemade appearance. Serve them with a homemade ketchup and you have a very special version of an all-American favorite.

    Making homemade ketchup was a first for me but after going through the simple process and tasting the fresh flavor, I’ll think twice before ever buying a store brand again.  Most commercial brands are loaded with sugar and include  chemicals and preservatives.  I’ve discovered it is quite easy to make your own ketchup and the flavor is completely unique – in a wonderful way.  So much more depth of flavor and none of that overpowering sugary taste.  Another wonderful discovery is you can make a large batch quite easily and freeze several jars for use at a later time.

    It may sound overwhelming to make homemade ketchup, but I found I already had most of the ingredients sitting in my pantry.  It didn’t take long, and I was able to create something truly flavorful.  Try it – once you start with the simple tomato & vinegar base, you can experiment by adding different flavors to make it your very own.

    Margie Bruner - Glory Kitchen

    owner of Glory Kitchen

    instagram
    facebook

    Russet & Sweet Potato Fries with Homemade Ketchup

    Yield: 6-10 servings

    Ingredients

      For the homemade ketchup:
    • 2 tablespoons olive oil
    • 1 onion, chopped
    • 5-7 cloves garlic, chopped
    • 2 teaspoons sambal chili paste
    • ¼ cup maple syrup
    • 2 teaspoons worcestershire
    • sauce
    • ¼ cup apple cider vinegar
    • 1 ½ teaspoons mustard powder
    • ½ cup tomato paste
    • 1 can whole peeled tomatoes, 28 oz.
    • 1 ½ teaspoons sea salt
    • For the fries:
    • Umbria nut & spice mix
    • 3-4 russet potatoes
    • 3-4 sweet potatoes
    • 2-3 sprigs fresh rosemary
    • olive oil
    • sea salt

    Instructions

      homemade ketchup:
    1. In a large stock pot, heat the oil. Add the onions and cook until lightly browned but not completely caramelized. Add the chopped garlic and brown lightly. Stir in the canned tomatoes and then all the remaining ingredients. Let this simmer on low, covered, for about 20 minutes. Remove the lid and let the tomato mixture cool a bit.
    2. Once it has had a chance to cool, puree the ketchup in a blender until completely smooth. Transfer to airtight glass jars or containers and refrigerate for up to 2 weeks. I usually fill one jar and place it in the refrigerator, then pour the remaining ketchup in glass jars and freeze to have on hand for future use. Should yield about 3-4 cups of ketchup.
    3. fries:
    4. Set the oven temperature to 450°. Wash & dry all potatoes. Prepare a baking sheet (I used one for each of the potato types) and line each with parchment or aluminum foil. Cut each potato into sticks. I like to leave the skins on for better nutrient value and I like the rustic appearance of having skins on. Lay across each baking sheet and drizzle the potatoes with olive oil.
    5. Chop the fresh rosemary very small and sprinkle over the potatoes. Add a generous pinch of salt to each as well as Umbria nut & spice mix. Toss gently to coat the potatoes with oil, herbs & spices. Layer them flat on the baking sheet trying not to overlap too much. This will help brown them more evenly.
    6. Place in a hot oven and bake for about 30-40 minutes or until they are nicely browned and crispy. I like to turn the broiler on at the last moment to crisp the tops. Remove from oven, add more salt (to taste) and more Umbria blend. Serve immediately alongside fresh homemade ketchup.

    Russet & Sweet Potato Fries - Glory Kitchen
    Homemade Ketchup
    Homemade Ketchup
    Homemade Ketchup
    Homemade Ketchup
    Russet & Sweet Potato  Fries with Homemade Ketchup
    Russet & Sweet Potato  Fries with Homemade Ketchup
    Russet & Sweet Potato  Fries with Homemade Ketchup
    Russet & Sweet Potato  Fries with Homemade Ketchup
    Russet & Sweet Potato  Fries with Homemade Ketchup
    Russet & Sweet Potato Fries with Homemade Ketchup
  • GOAT CHEESE TRUFFLES

    Serving these little bite-sized goat cheese truffles crusted with nuts, herbs and spices is such a nice surprise combination of creamy tangy cheese, and crunchy nut flavor.  I was first introduced to the idea of making goat cheese truffles by the talented California duo,  Canyon Girls Catering, who serve these on their event cheese trays.  These little balls of goodness are simple and quick to make yet can be elegantly presented as an appetizer alongside a glass of wine and some crusty bread.

    The truffles can be made using any of our 6 blends of Glory Kitchen nut & spice mixes, stacked up and served on their own, or can be included as part of an elaborate cheese tray.  Each variety of cheese truffle offers a unique bite of spice, crunch and creamy flavor.  They are fun to present and even more fun for guests to sample the different varieties.

    Chévre is the french term for goat cheese and is obviously made from goat’s milk. It has a tart, tangy flavor and a lower fat content than cheese made from cow’s milk. As it ages, it becomes more robust and bolder in flavor.

    Most goat cheese originates from France and in addition to Chévre, other varieties include Chabis & Boucheron.  The next time you offer to bring an appetizer for a gathering of friends, bring an assortment of these flavorful cheese truffles for something unique and interesting.

    Margie Bruner
    owner of Glory Kitchen

    instagram
    facebook

    Goat Cheese Truffles

    Ingredients

    Instructions

    1. Bring the goat cheese to room temperature. Take a small spoonful of cheese, and with your hands, roll it into a small but compact ball. Take any of the Glory Kitchen nut & spice mixes and spread some out onto a small, flat plate. Roll the goat cheese ball into the nut blend until it is completely covered on all sides. Once all of your cheese truffles are finished, refrigerate to set and then serve cool or at room temperature alongside crackers or slices of crusty bread.

    Notes

    These little truffles are a great addition to a festive cheese tray or are quite special on their own served with a side of good bread and a glass of wine.

    Penang Asian nut & spice mix - Glory Kitchen
    Goat Cheese Truffles - Glory Kitchen
    Goat Cheese Truffles - Glory Kitchen
  • SMOKY ROASTED TOMATO SOUP WITH GRUYERE AND UMBRIA CROSTINI

    This tomato soup is elevated by roasting tomatoes to create wonderful caramelization.  Melissa Wright is sharing her favorite family soup recipe…

    Melissa Wright
    mother, physician and food blogger
    instagram: @wrightfamilytable
    website: www.wrightfamilytable.com

    I first started making soup with roasted tomatoes a few years ago, and I haven’t looked back since. Tomato soup is the ultimate comfort food for cold and drizzly days, and the smell of vegetables slowly caramelizing in the oven filling the kitchen is an added bonus.

    This spiced version is a new favorite in our home. The smoked paprika and Umbria from Glory Kitchen pair together to create a fuller flavor that balances out the sweetness brought by roasting the vegetables. If you have always loved the classic combo of grilled cheese and tomato soup, then you will love this grown-up version.   (food and photos created by Melissa)

    Smoky Roasted Tomato Soup with Gruyere & Umbria Crostini

    serves 8

    Ingredients

      For the soup:
    • 2 teaspoons UMBRIA nut & spice mix
    • 3 lbs fresh tomatoes (mix of cherry, vine, plum, etc.)*
    • 2 small yellow onions, sliced
    • 6 cloves garlic, peeled
    • ½ cup extra virgin olive oil
    • 2 teaspoons smoked paprika
    • salt and freshly ground pepper, to taste
    • 3 cups chicken stock
    • *fresh tomatoes can be substituted with 42 ounces of canned tomatoes. Drain tomatoes before using.
    • For the crostini:
    • 1 tablespoon UMBRIA nut & spice mix
    • 1 heaping cup finely grated gruyere cheese
    • 1 baguette, sliced

    Instructions

    1. Preheat oven to 450°. Line a baking sheet with parchment.
    2. Wash tomatoes. Core, deseed, and cut the tomatoes into halves (cherry tomatoes can remain whole). Spread tomatoes, garlic, and onions onto prepared baking sheet. In a small bowl, stir together the olive oil, 2 teaspoons Umbria, and smoked paprika. Pour over tomatoes, garlic, and onions. Gently stir to coat, then season with salt and pepper. Roast in preheated oven for 25-30 minutes, until vegetables are soft and beginning to brown in places.
    3. Place roasted tomatoes, onions, and garlic and any juices from the pan into a large stockpot. Add chicken stock. In batches, place mixture into a blender and blend until very smooth. Return to stockpot and place over medium heat. Let simmer until slightly reduced and thickened, about 10-15 minutes. Season with additional salt and pepper, if needed.
    4. While soup thickens, make the crostini. Preheat the oven broiler. Stir gruyere and the 1 tablespoon Umbria together in a bowl. Place crostini slices on a baking sheet. Toast slices in preheated oven until just beginning to become golden on the edges, about 1-2 min per side. Remove from oven, and top with spice and cheese mix. Place back in the oven, and broil until cheese is melted and bubbling, about 1 more minute.
    5. Serve soup warm with crostini.

    Smoky Roasted Tomato Soup
    Smoky Roasted Tomato Soup
    Smoky Roasted Tomato Soup
  • 4 INGREDIENT SPAGHETTI SQUASH

    With only 4 ingredients, this dish is not only simple but delicious and satisfying.  The question often asked is, does spaghetti squash really taste like spaghetti?  Well, it is long and stringy like spaghetti pasta, but it is not made of flour, it is a vegetable so it has a very different taste and texture.

    The flesh inside is solid when raw, but once cooked and roasted, the inside cavity flakes into long stringy strands, hence the name spaghetti squash.

    I often prepare this spaghetti squash as a meal using the half squash as a vessel to fill with meat or sautéed vegetables but it also works well as a side dish.

    The long strands could be wonderful prepared as a bed for grilled fish to sit upon – think salmon, sea bass or flounder.  Yet another alternative, try the roasted spaghetti squash tossed with a bit of butter and any of the Glory Kitchen nut & spice mixes.

    And finally, the most obvious way to utilize is to use it as the noodle instead of pasta and make a typical spaghetti dish with marinara sauce topped with fresh grated parmesan.  Oh the possibilities.

    Margie Bruner - Glory Kitchen

    Margie Bruner
    owner of Glory Kitchen

    instagram
    facebook

    4 Ingredient Spaghetti Squash

    4 servings

    Ingredients

    • Umbria nut & spice mix
    • 1 spaghetti squash
    • 1 large box grape tomatoes
    • 1 cup brown rice, cooked
    • seasonings:
    • olive oil
    • sea salt
    • fresh herbs

    Instructions

    1. Preheat oven to 450°. Slice spaghetti squash in half lengthwise and scoop out the seeds, cleaning out the inner cavity. Slicing a squash can be difficult, especially if it is a large one, so use a large chef's knife and work slowly & carefully. Using your hands, oil the entire inside cavity of the squash with a drizzle of olive oil. Place face up on a parchment lined (or foil) baking sheet. Season with salt and Umbria nut & spice mix. Bake in the oven for about 30-40 minutes or until the flesh is lightly browned and the squash strands flake easily with a fork. Remove from the oven and cool completely.
    2. While the spaghetti squash is baking, arrange the tomatoes (can use grape tomatoes, cherry tomatoes, or heirloom) on a lined baking sheet and drizzle with olive oil. Season with a sprinkle of sea salt & Umbria nut & spice mix. Place in the same oven and roast about 15-25 minutes. Remove and cool.
    3. In a large bowl, mix together spaghetti squash, tomatoes and cooked brown rice. Add fresh herbs (I used fresh oregano but basil, thyme, parsley or chives would also be great). Taste and add additional seasoning if needed. Top with a generous sprinkle of Umbria nut & spice mix and serve.

    Notes

    Spaghetti squash pairs beautifully with any of the Glory Kitchen nut & spice mixes. Often times I will simply toss it with browned butter, a sprinkle of salt and one of the nut & spice mixes... so yummy!

    4-Ingredient Spaghetti Squash Bowl with Umbria nut & spice mix
    4-Ingredient Spaghetti Squash Bowl with Umbria nut & spice mix
    4-Ingredient Spaghetti Squash Bowl with Umbria nut & spice mix
    4-Ingredient Spaghetti Squash Bowl with Umbria nut & spice mix
    4-Ingredient Spaghetti Squash Bowl with Umbria nut & spice mix
    4-Ingredient Spaghetti Squash Bowl with Umbria nut & spice mix
    4-Ingredient Spaghetti Squash Bowl with Umbria nut & spice mix
Updating…
  • No products in the cart.

JOIN US !
JOIN
close-link