Author Archives: Margie

  • Broccoli and Cauliflower Soup - Glory Kitchen

    BROCCOLI AND CAULIFLOWER SOUP

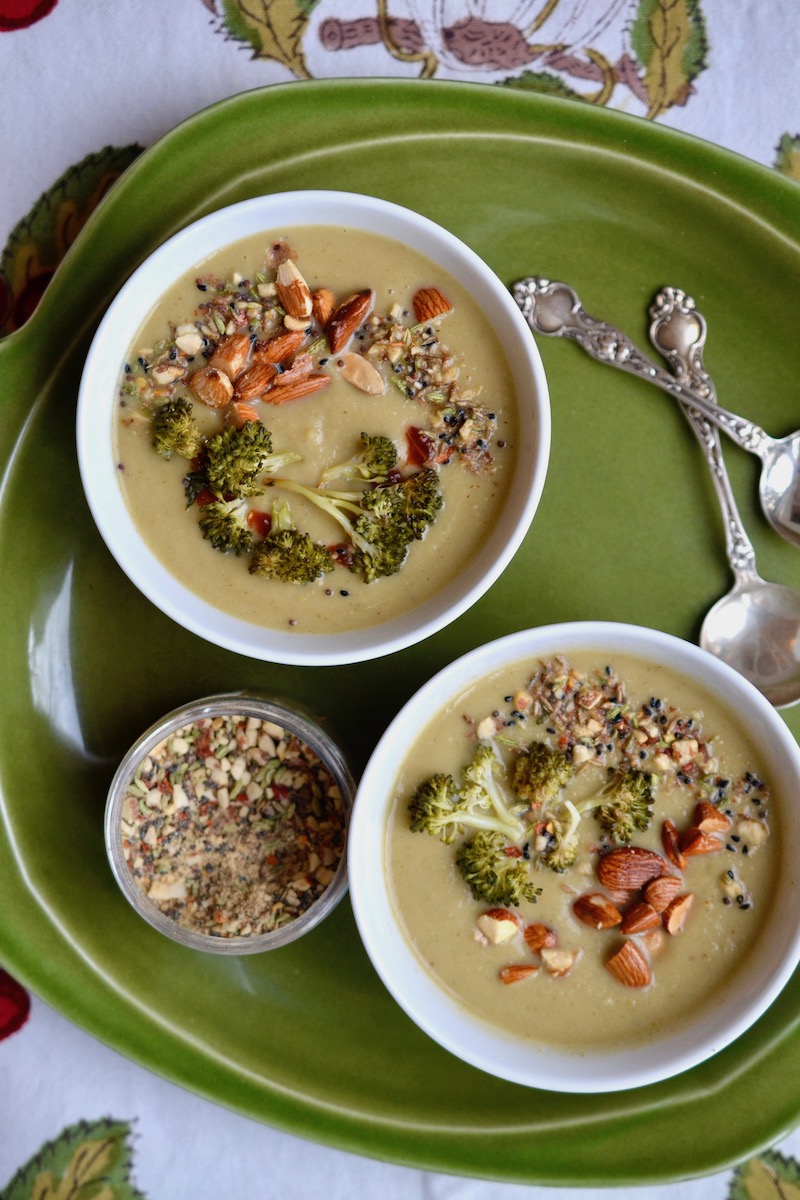
    A warm bowl of Broccoli and Cauliflower Soup is the best thing to cure cold weather blues.  Soup can be warming, filling and oh so satisfying.  I’ve been making loads and loads of various soups and then freezing a batch to have on hand later in a pinch.  I decided to stock my freezer with various soups to get us through the winter and started with this delicious Broccoli and Cauliflower one.

    In this recipe I first roasted the cauliflower, broccoli, and onions to create a nice smoky flavor on the vegetables before they went into the soup base and were pureed into creamy goodness.  A touch of our Mumbai nut & spice blend made up of Indian flavors also added an interesting dimension of flavor.  And of course the crunchy topping of almonds, Mumbai blend and tiny roasted broccoli florets added a great visual appeal.  It also gives a bit of a hint as to what you’ll be enjoying in that soup bowl.

    I’ll be making more soups in the next few weeks but for now, enjoy this delicious Broccoli and Cauliflower soup.

    Margie Bruner - Glory Kitchen

    Margie Bruner
    owner of Glory Kitchen

    instagram
    facebook

    Broccoli and Cauliflower Soup

    Ingredients

    • 1 full head cauliflower
    • 1 full head broccoli
    • 2 yellow onions
    • olive oil
    • 6 cups chicken stock (or more)
    • 3 cups water
    • 2 teaspoons Mumbai nut & spice mix
    • 3/4 teaspoon sea salt
    • 1 cup half and half cream
    • 1 tablespoon lime, fresh
    • for garnish:
    • tiny broccoli sprigs
    • almonds, roughly chopped
    • sprinkle Mumbai nut & spice mix

    Instructions

    1. Preheat the oven to 425°. Chop the full head of broccoli and cauliflower, include the stems, leaves and all. Roughly slice the two onions. Using 3 separate baking sheets, place each veggie on each sheet, drizzle each vegetable tray with olive oil and generously sprinkle them with sea salt. Using your hands, toss them gently to incorporate the oil onto the cut veggies. I like to use 3 separate trays because some of the vegetables will brown quicker than the others and it can be removed when needed. If you're short on baking trays, you can mix the vegetables together. Place them into the hot oven and roast them for about 30-40 minutes or until they are a bit browned and have softened. Remove from the oven and allow to cool completely. Separate a few little broccoli sprigs to use for garnishing the top of the soup just before serving.
    2. Using a blender, scoop in some of the cooled vegetables (fill to about half) and then pour in chicken stock to cover well (can also use vegetable stock if you prefer this soup to be 100% vegetarian). Blend until smooth and if needed, add more chicken stock so you get a good puree. I like my soup very smooth so I blend it well. After it is pureed well, pour into a very large stock pot and begin your next batch. On the last blender batch of vegetables, add 2 teaspoons of Mumbai nut & spice mix and blend it into the veggies well. Pour all of this into the stock pot.
    3. To the stock pot, add, 3/4 teaspoon of salt, the lime juice and water until you reach the consistency you like. Once it is heated through, add a bit of half and half at the very end to make it a bit creamy. You can omit the cream if you wish. Remember when using cream, if you boil after you've added, this can cause the cream to curdle. I always make certain to add the cream when it is at a very low simmer and remove from the heat soon after.
    4. Ladle the soup into serving bowls and garnish the tops with little sprigs of broccoli, roughly chopped almonds, and a sprinkle of Mumbai nut & spice mix. You can also add a few drops of sriracha to add a few notes of heat. Serve immediately.
    5. This is a very large batch of soup. I purposely made it large so I could store away a bit in the freezer for a quick meal in the future. The recipe yielded enough to make (3) 6-cup containers. We enjoyed broccoli & cauliflower soup for dinner and then had enough leftover to store away 2 containers in the freezer.

    Broccoli and Cauliflower Soup - Glory Kitchen
    Broccoli and Cauliflower Soup - Glory Kitchen
    Broccoli and Cauliflower Soup - Glory Kitchen
    Broccoli and Cauliflower Soup - Glory Kitchen
  • Spinach and Tomato Spaghetti Squash - Glory Kitchen

    SPINACH AND TOMATO SPAGHETTI SQUASH

    Spaghetti Squash doesn’t get as much attention as I believe it deserves.   If you’ve never made spaghetti squash you are probably wondering if it really IS like spaghetti.  Well,  yes, and no.  Once baked and tender, the strands are long and stringy as you scrape a fork across the flesh of the squash.  They are long and spaghetti-like but a bit more delicate than pasta – and of course, it is a vegetable after all,  not an actual noodle made from flour.

    The flavor is sweet and earthy, especially when it is rubbed with olive oil, seasoned with sea salt, and roasted in a hot oven.  I like to roast them face side up so the edges of the open squash get a bit brown and caramelized.

    Once it is cooked and tender, the stands just tenderly pull apart to create a deliciously stringy base for flavorful toppings.  Some like to treat this bright yellow squash like real spaghetti and top it with marinara sauce but I prefer to top it with flavorful and colorful veggies and then top that with toasty breadcrumbs and the nutty Italian flavors of our Umbria nut & spice mix.  The chopped almonds, rosemary, aleppo peppers and sundried tomatoes give this dish a robust and tangy flavor.

    This is one vegetarian meal you just can’t get enough of.  Each half squash makes one serving but we found ourselves scraping to the bottom of the cavity to get every last morsel.  The capers added a nice vinegar tang to counterbalance the rich roasted tomatoes.  I also loved the crunchy breadcrumb & Umbria blend  topping which gave it a wonderful and textural crunch.  This is definitely a recipe to repeat over and over.

    Margie Bruner
    owner of Glory Kitchen

    instagram
    facebook

    Spinach and Tomato Spaghetti Squash

    serves 2

    Ingredients

      For the breadcrumb topping:
    • 2 teaspoons Umbria nut & spice mix
    • 2 teaspoons olive oil
    • 1/2 cup panko bread crumbs
    • 2 tablespoons shredded parmesan cheese
    • sea salt
    • For the spaghetti squash:
    • 1 spaghetti squash
    • olive oil
    • Umbria nut & spice mix
    • 1 lb (16 oz) grape tomatoes
    • 1 bag fresh spinach (or 4 handfuls)
    • olive oil
    • 4 garlic cloves, minced
    • 1 tablespoon capers & their juice
    • sea salt

    Instructions

    1. Slice the grape tomatoes lengthwise, spread them onto a parchment lined baking sheet, drizzle with olive oil & sea salt and place them into a 350° oven to roast for about 15 minutes. Check after 15 minutes, some may be a bit crispy but do not let them burn. Remove from the oven as soon as they are browned a bit but not completely dry. Allow them to cool completely.
    2. Heat a sauté pan on the stove top, add 2 teaspoons of olive oil to the bottom, then add the panko bread crumbs, a pinch of salt, 2 teaspoons of Umbria nut & spice mix and stir over the heat until they lightly toast. Remove from the heat, allow to cool a bit, then add the shredded parmesan, toss and set aside to use as a topping over the prepared spaghetti squash.
    3. Take the spaghetti squash and place in the microwave for about 2-3 minutes to soften the flesh enough to slice through with a large chef's knife. When it is cooled a bit from the microwave, slice it lengthwise into two pieces. Clean the seeds out of the cavity (hint: I always use a grapefruit spoon which has serrated edges and it helps with the scraping). Using your hands, rub the inside cavity with a drizzle of olive oil and rub it well. Sprinkle the inside cavity with a bit of sea salt and a bit of Umbria nut & spice mix. Place the squash face up on a baking sheet and bake in a 400° oven for about 20-30 minutes. Remove and allow it to cool a bit. Scrape the inside to loosen the strands of squash but leave them in the squash cavity.
    4. In a saucepan, add a bit of olive oil & heat through. Add the minced garlic and cook a bit without burning. Add the fresh spinach, the capers, about 2-3 teaspoons of the caper liquid and a sprinkle of Umbria nut & spice mix. Add the roasted tomatoes which were set aside. Remove from heat and mix well. Toss the tomato/spinach mixture into the cavity of the spaghetti squash, top with the crunchy panko crumb mixture, a bit more of Umbria nut & spice mix, and serve. This only serves 2 persons but can be doubled or tripled to serve 4-6. Enjoy!

    Spinach and Tomato Spaghetti Squash - Glory Kitchen
    Spinach and Tomato Spaghetti Squash - Glory Kitchen
    Spinach and Tomato Spaghetti Squash
  • Cheesy Potato Gratin - Glory Kitchen

    CHEESY POTATO GRATIN

    A Cheesy Potato Gratin makes for great comfort food.  And who wouldn’t love this dish paired with a roast, baked chicken or a nice grilled steak?  Serving this Potato Gratin alongside a large, crisp salad would also be terrific – the perfect meatless meal.

    Baking a Cheesy Potato Gratin might seem complicated or time consuming, however, it is really an easy process.  Once you’ve made it a couple of times, it is quite easy to commit the process and the primary ingredients to memory so you can whip up a gratin in no time.

    The one thing which made it even more simple was the use of a mandoline to slice the potatoes.  I use a mandoline often for quick uniform slices of all types of vegetables, however, I managed  contently without one for many, many years.  It was only recently that I finally added this gadget to my collection of kitchen utensils.  I  I love using a mandoline, but don’t let the lack of one hold you back.  Making this dish is just as easy using a large kitchen knife to slice the potatoes.

    I’ve seasoned this Cheesy Potato Gratin with our Glory Kitchen Cairo nut & spice mix, a crunchy combination of chopped hazelnuts and Middle Eastern spices.  The black pepper adds a bit of heat and the combination of black & white sesame seeds adds great crunch.  This is a perfect potato side dish for holiday gatherings or it also works well on a cold winter’s night when you’re yearning  for a nice cozy and comforting meal.

    Margie Bruner - Glory Kitchen

    Margie Bruner
    owner of Glory Kitchen

    instagram
    facebook

    Cheesy Potato Gratin

    Ingredients

    • about 1 teaspoon Cairo nut & spice mix
    • 1 1/2 -2 lbs potatoes, I used a medley of purple, red skinned & yukon gold
    • 1-2 tablespoons butter, softened
    • fresh thyme, about 1 teaspoon or more
    • fresh nutmeg, about 1 teaspoon, grated
    • sea salt, about 1 teaspoon
    • 1 cup heavy cream
    • 1/2 cup chicken or vegetable stock
    • 1/2 cup gruyere cheese, shredded
    • 1/4 cup parmesan cheese, grated

    Instructions

    1. Preheat the oven to 425°. Generously butter the base and sides of a deep dish pie plate using the softened butter & set aside.
    2. Whisk together the cream and the chicken stock. Mix together the parmesan and the gruyere cheeses.
    3. Using a mandoline, slice the potatoes about 1/8" thick then layer them into the buttered pie dish overlapping the potatoes and alternating if using a variety of type and color. I begin on the outside edge and build it around in a circular motion. Once the bottom layer is filled, sprinkle the potatoes with sea salt, Cairo nut & spice mix, a bit of freshly grated nutmeg and a sprinkle of fresh thyme leaves. Build the next layer and repeat the process with the same seasonings: salt, Cairo nut mix, fresh thyme, and a light sprinkle of nutmeg. Go for the third layer and do the same until the pan is filled. My pan was able to hold 4 layers but keep going until you fill the dish. Do not overfill the pie dish because you need a bit of room to hold the cream mixture and then top it with a layer of cheese.
    4. Take the cream mixture and slowly pour it over the layers of the potato. It should almost fill the dish. Layer the very top with the cheese mixture and an extra sprinkle of Cairo seasoning, sea salt, nutmeg and fresh thyme. Dot the potatoes with a bit of butter around the top (about 1 tablespoon in total) and then place into the oven. You may want to place a baking sheet underneath the pan just incase it bubbles over. Bake for 40 - 45 minutes or until it is bubbly and the cheese top has lightly browned.
    5. Remove from the oven and let it set for about 10 minutes before serving. This can be made ahead and then warmed later with aluminum foil covering the dish until it is warm and bubbly. Top with a few fresh sprigs of thyme just before serving.

    Cheesy Potato Gratin - Glory Kitchen
    Cheesy Potato Gratin - Glory Kitchen
    Cheesy Potato Gratin - Glory Kitchen
    Cheesy Potato Gratin - Glory Kitchen
    Cheesy Potato Gratin - Glory Kitchen
    Cheesy Potato Gratin - Glory Kitchen
  • Ravioli with Butter Sauce - Glory Kitchen

    RAVIOLI WITH BUTTER SAUCE

    This Ravioli with Butter Sauce seasoned with Umbria, our Italian blend of nuts & spices, is a great go-to meal when life gets busy… AND because there are only a few days left before Christmas, I want to share my quick and delicious pasta dish – one that satisfies every time.

    Last minute shopping, preparing for family gatherings and attending holiday events can keep you running, but your meals shouldn’t have to suffer.  This pasta dish is melt-in-your-mouth good and pleases young and old alike.

    I apologize to any pasta purists who make their own homemade pasta and scoff at the idea of buying a box of ready-made ravioli.  Although I am in awe of those out there who lovingly make their own, the reality is, I just don’t have the time.

    I always keep a box of ravioli in the freezer waiting for that busy day when I only have a few minutes to prepare a quick meal at home.  This one is absolutely delicious and can be prepared in about 15-20 minutes (or less!) with very few ingredients.

    All you need is our Umbria nut blend, some handfuls of fresh spinach, parmesan, a bit of butter and some ravioli tucked away in the freezer.  That’s it.  Enjoy every bite of this deliciously satisfying Italian meal.

    Margie Bruner
    owner of Glory Kitchen

    instagram
    facebook

    Ravioli with Butter Sauce

    Ingredients

    • Umbria nut & spice mix
    • 9 oz. package ravioli (I used mushroom & cheese)
    • 2 tablespoons butter
    • 1 1/2 cups pasta water
    • 1 5oz. bag fresh spinach
    • block of fresh parmesan cheese
    • pinch of salt

    Instructions

    1. Following the package directions, cook the ravioli in salted water (I add a drizzle of olive oil to keep the raviolis from sticking together). Cook until al dente, do not over cook. Just before draining, reserve 1 1/2 cups of the pasta water. Drain the pasta.
    2. In a sauce pan, melt the butter, add the Umbria nut & spice mix and toast for a minute. Add 1 cup pasta water, about 2 tablespoons shredded parmesan, pinch of salt and stir quickly until it is a nice, buttery sauce. Add more pasta water if needed. Toss in the fresh spinach and stir just until wilted. Add the ravioli into the saucepan and incorporate into the butter sauce. Serve immediately on a platter and top with additional Umbria nut & spice mix and large shaves of parmesan. Enjoy!

    Ravioli with Butter Sauce - Glory Kitchen
    Ravioli with Butter Sauce - Glory Kitchen
    Ravioli with Butter Sauce - Glory Kitchen
    Ravioli with Butter Sauce - Glory Kitchen
  • Persimmon Muffins - Glory Kitchen

    PERSIMMON MUFFINS

    Persimmons are a wonderful winter fruit and I’ve begun seeing this mysterious fruit more often in recipes – hence I’ve come up with a delicate and bright Persimmon Muffin Recipe to highlight this pretty little orange fruit.  I love the way a thinly sliced persimmon is perched atop the muffin as its ruffled edges curled and crisped during the baking process.  I’ve also added a touch of french herbs from our Glory Kitchen Provence nut & spice mix to add an interesting dimension of flavor.

    I was recently driving down the road in Charlotte and was caught by surprise as I whizzed by the sight of a bright, bare, orange-balled tree.  As I turned the car around to get a better view of this unusual sight, I realized it was a persimmon tree – and I had never before seen one in full bloom.

    These trees are quite rare around here and they are certainly a sight when their bare branches are bursting with large, bright, orange fruit.  I stepped out and photographed the tree, however, what I really wanted to do was return with a ladder and basket to gather persimmons for jam making.  With just a few from the farmers market, I made these muffins instead.

    I’ve heard the taste of a persimmon described in many ways: some say it tastes like an apple, others say it is like a mango.  Although I can see similarities to both of those, I actually think it has its own unique flavor.  The skin can be tough but for this muffin recipe I sliced it into horizontal rounds, then sliced it into sticks, then into cubes – all with skins on.  After baking in the muffin tin, the fruit was tender and very much resembled the texture of a chopped apple.

    If you’ve never tried a persimmon, this is a great recipe to give it a taste and highlight the pretty orange fruit right on top of your muffin.

    Margie Bruner
    owner of Glory Kitchen

    instagram
    facebook

    Persimmon Muffins

    Yield: 12 muffins

    Ingredients

    • 1 teaspoon Provence nut & spice mix
    • 2 cups all-purpose flour
    • 1 tablespoon baking powder
    • 1/4 teaspoon salt
    • 1/2 teaspoon allspice
    • 2 large eggs
    • 1 cup milk or cream
    • 3/4 cup sugar
    • 1/2 cup butter, melted
    • 1 teaspoon vanilla
    • 1 cup persimmons, chopped (about 2-3 depending upon size)
    • 1 whole persimmon (for the muffin topping)
    • mandolin (for slicing the persimmon very thin) or just use a chef's knife and cut very thin slices, horizontally.
    • melted butter (to brush on persimmon tops)

    Instructions

    1. Position the rack in the center of the oven. Preheat oven to 400°. Line a muffin tin with paper liners or lightly grease each well in the tin.
    2. Sift together in a large bowl the flour, baking powder, salt, and allspice. Stir in the Provence nut & spice mix, set aside.
    3. Whisk together in another large bowl, eggs, milk (or cream)sugar, butter and vanilla.
    4. Add the wet ingredients into the dry ingredients and mix together until incorporated but you do not need to over-mix to get an extra smooth mix. Stir in the cup of chopped persimmons.
    5. Divide the muffin batter among the 12 muffin cups. I like to use an ice cream scoop to get equal amounts into each well. Now take your persimmon and either using a mandolin or a large knife, slice 12 very thin rounds, horizontally. (see photos). Place one on top of each muffin cup. Brush the top of each persimmon with melted butter.
    6. Bake in the oven at 400° for about 17 minutes or until the muffins are nice and puffed, the persimmon tops are curled on the edges, and a toothpick comes out clean. Allow to cool for a few minutes and serve warm if possible. With muffins, I often freeze any leftovers, wrapping them individually, so they can be pulled out the night before and enjoyed with a cup of coffee in the morning.

    Persimmon Muffins - Glory Kitchen
    Persimmon Muffins - Glory Kitchen
    Persimmon Muffins - Glory Kitchen
    Persimmon Muffins - Glory Kitchen
    Persimmon Muffins - Glory Kitchen
    Persimmon Muffins - Glory Kitchen
    Persimmon Muffins - Glory Kitchen
  • Broccolini with Chipotle Drizzle

    BROCCOLINI WITH CHIPOTLE DRIZZLE

    Broccoli is a favorite vegetable for many but this Broccolini With Chipotle Drizzle is almost like eating junk food – you just can’t get enough.  The good news?  It is good for you, it is quick and it is simple to prepare.

    All you need is plenty of baby broccoli, a few basic ingredients, and of course, our Glory Kitchen San Miguel nut & spice mix.  I have to admit I had this Broccolini with Chipotle Drizzle as my entire meal because it was just so delicious I did not want to bother with anything else.  If only I had added some shredded chicken on top it could have sufficed as a complete meal.

    I’ve heard this called both broccolini and baby broccoli.  It is a relatively new natural hybrid of the old standby of basic broccoli.  Hybrid, as opposed to genetically modified, and created by a Japanese company in California in the early 1990’s.  Broccolini has smaller, looser florets and longer, thinner stalks than typical broccoli.  Overall, the stalks are more tender and I believe, tastier when cooked.  I always cook broccolini in its entirety – florets, stalks, leaves and all.  The only thing I do to prepare it after washing and drying, is to slice off the ends to expose the fresh stalk. Once you do this, you are ready to cook.

    This has become one of my very favorite vegetables as of late and I enjoy interchanging the recipe with a variety of our Glory Kitchen nut mixes.  After trying it with the San Miguel, try making it again and altering the nut blend – the Cairo, Mumbai, Penang, Umbria or Provence blends would all be wonderful used in a similar way (just remove the chipotle and paprika from the recipe).

    And as a side note, if you are not one to handle spicy sauces, you may want to reduce the amount of ground chipotle added to the sauce, or you could always leave it out altogether.  Don’t leave out the paprika, however, it adds nice color to your drizzle.  Hope you enjoy as much as I did.

    Margie Bruner
    owner of Glory Kitchen

    instagram
    facebook

    Broccolini with Chipotle Drizzle

    Yield: serves 6-8

    Ingredients

      For the chipotle drizzle:
    • 4 tablespoons olive oil
    • 2 tablespoons lime juice, fresh
    • 2 tablespoons greek yogurt
    • 1 teaspoon San Miguel nut & spice mix
    • 1/2 teaspoon chipotle pepper, ground (or cayenne)
    • 1/2 teaspoon paprika
    • 1/4 teaspoon salt
    • 2 pinches sugar
    • For the broccolini:
    • 16 oz, broccolini (also called baby broccoli)
    • San Miguel nut & spice mix
    • olive oil
    • pinch of salt
    • chipotle drizzle (recipe above)
    • queso fresco (for garnish)

    Instructions

    1. Set the oven to 450°.
    2. Whisk together the ingredients for the chipotle drizzle. Taste for flavor and add additional ingredients, such as more heat from the chipotle, as preferred. Set aside.
    3. After washing and drying the broccolini, cut a bit of the ends, place it on a foil lined baking sheet and drizzle with a bit of olive oil, a sprinkle of sea salt, and a sprinkle of San Miguel nut & spice mix. I do not remove any of the leaves but instead roast the stalk in its entirety. Using your hands, work the olive oil and seasonings into the baby broccoli so it is lightly coated. Spread the broccolini out onto the baking sheet so the stalks are not crowding each other and place into the hot oven for about 10 minutes. Be careful not to let them burn, but you do want some of the tips browned - this adds to the flavor.
    4. Remove from the oven, allow to cool a bit and place them on a serving platter. Drizzle the broccolini with a bit of the chipotle sauce, sprinkle all over with queso fresco, and add a bit more sprinkling of the San Miguel nut & spice mix. These can be served warm but I often will serve the broccoli at room temperature along with a simple entrée such as grilled fish or chicken.

    Broccolini with Chipotle Drizzle
    Broccolini with Chipotle Drizzle
    Broccolini with Chipotle Drizzle
    Broccolini with Chipotle Drizzle
    Broccolini with Chipotle Drizzle
  • Indian Spiced Salmon Over Wild Rice Medley - Glory Kitchen

    INDIAN SPICED SALMON OVER WILD RICE MEDLEY

    Salmon is a favorite of many and this Indian Spiced Salmon Over Wild Rice Medley recipe is a simple way to highlight a lovely piece of fish with a light seasoning of interesting and unique flavors from our  Mumbai nut & spice mix.  A touch of fennel, cumin and fenugreek season this flavorful fish in the perfect way.  The result is not too strong – a subtle but interesting dusting of Indian spices adds just the right layer of seasoning.

    For the wild rice medley I added the gorgeous colors of heirloom carrots, however, if you have trouble finding this type of veggie, you can always use the typical orange variety.  In addition, instead of using only wild rice, I combined a half and half mixture of wild rice and black rice, simply because I had both on hand and I wanted to see how both would work together.

    The result was great, especially since I cooked it in vegetable stock instead of just water for a bit of added flavor.  Once you add the sauteéd red onion and carrots to your cooked rice, you’ve created a tasty and colorful bed for your salmon to sit upon.

    This Indian Spiced Salmon Over Wild Rice Medley makes such a pretty presentation, I think it would be a great meal to use for winter entertaining – especially if you are serving to a health conscious crowd.  Enjoy!

    Margie Bruner - Glory Kitchen

    Margie Bruner
    owner of Glory Kitchen

    instagram
    facebook

    Indian Spiced Salmon Over Wild Rice Medley

    Yield: serves 4

    Ingredients

      For the dressing:
    • 2 teaspoons Mumbai nut & spice mix
    • 1/4 cup olive oil
    • 1/4 cup lemon juice, fresh
    • 2 teaspoons dijon mustard
    • 2 teaspoons honey
    • pinch of salt & pepper
    • For the salmon:
    • Mumbai nut & spice mix
    • 1 1/2 -2 lb salmon
    • 3 cups wild rice, cooked
    • 4-5 heirloom carrots (if possible: purple, yellow & orange)
    • 1 1/2 cup fresh parsley, chopped
    • 1 large red onion, chopped
    • olive oil
    • dressing (recipe above)

    Instructions

    1. Whisk together the ingredients for the dressing and set aside.
    2. Heat a sauté pan, add a drizzle of olive oil, when the oil is heated, add the chopped red onion and chopped carrots. I try to chop both about the same size. I love to use the variety of carrots from heirlooms, however, if you cannot find these you can certainly use regular carrots. When they have softened and browned a bit (don't over cook because it's nice to have a bit of crunch in the vegetables), remove from heat and allow them to cool a bit.
    3. Add the carrot/onion mixture into a large bowl with the cooked rice. Concerning the rice, I used a mixture of half black rice and half wild rice simply because I had both however, you can use just wild rice. I always cook my rice in vegetable or chicken stock instead of just water and add a pinch of salt - this adds a great flavor to your rice. To the rice, toss in the chopped parsley and 2 tablespoons of the dressing. Toss together and set this aside as your base for the baked salmon.
    4. Heat the oven to 450°. Slice the salmon into individual servings and pat it dry with a paper towel (this helps crisp the skin side. Drizzle the salmon with a bit of olive oil and rub the top and bottom with your hands so it is lightly coated. Using a cast iron pan, heat it through on a stove top, add a bit of olive oil, then place the salmon, skin side down, into the hot pan and let it brown the skin for a few minutes. Generously sprinkle the top with Mumbai nut & spice mix and place the hot pan into the oven for about 10 minutes to cook the salmon through.
    5. Remove the salmon from the oven and place it over a bed of the wild rice medley. Drizzle the tops of each salmon with the dressing and drizzle any remaining dressing onto a bit of the rice medley. Garnish with a bit of fresh herbs (in the photo I used fennel fronds, but if you have any leftover parsley leaves this would work well too) and serve immediately.

    Indian Spiced Salmon Over Wild Rice Medley - Glory Kitchen
    Indian Spiced Salmon Over Wild Rice Medley - Glory Kitchen
    Indian Spiced Salmon Over Wild Rice Medley - Glory Kitchen
    Indian Spiced Salmon Over Wild Rice Medley - Glory Kitchen
  • Pomegranate, Pine Nut and Apple Salad - Glory Kitchen

    POMEGRANATE, PINE NUT AND APPLE SALAD

    If you need a light meal following the Thanksgiving celebration, this Pomegranate, Pine Nut and Apple Salad is hands down one of the best salads I’ve had this fall.  And if you think you don’t like kale, you must try this salad and reevaluate your position.  This salad is simple to make but delicious on so many levels… a little sweet from the apples and maple dressing, a bit of red pepper heat from our Glory Kitchen Penang nut & spice mix, earthy flavors from the wild rice, and a burst of sweet juiciness from the bright red pomegranate seeds.  If you want a more substantial salad you could always add some leftover turkey, however, this was quite filling on its own.

    It seems that kale is on every menu these days and for good reason.  Not only is it a trendy green but it is loaded with all types of health benefits; vitamins A, K, C, B6, Manganese, Calcium, and the list goes on.  It’s filled with antioxidants and when prepared properly, it can be really delicious.

    The key is to pick the right type of kale, cut it well, and massage it with olive oil to break down the cells of the tough leaves.  My personal favorite kale leaf is Tuscan kale, also called lacinato, because of its dark color and smooth texture, but there are many other varieties such as curly, red leaf and others which are all worth a try.

    Add this salad as a side to your meal or make it large enough to enjoy as a salad entrée – I can’t wait to make this one again.

    Margie Bruner - Glory Kitchen
    Pomegranate, Pine Nut and Apple Salad

    Yield: serves 4

    Ingredients

      For the dressing:
    • 1 teaspoon Penang nut & spice mix
    • 1/2" fresh ginger, grated
    • 1 clove garlic, grated
    • 2 tablespoons apple cider vinegar
    • 1 1/2 teaspoons maple syrup
    • 1 teaspoon sea salt
    • pinch of black pepper
    • 1/4 cup extra-virgin olive oil
    • For the salad:
    • 1 bunch Tuscan (lacinato) kale
    • 1 1/4 cups wild rice (cooked)
    • 1 red apple, thinly sliced
    • 1/4 cup pine nuts
    • 1/2 cup pomegranate seeds
    • drizzle olive oil
    • sprinkle Penang nut & spice mix

    Instructions

    1. Mix all the ingredients for the dressing and set aside. To grate the ginger & garlic, I use a microplane and grate it right into the mixing bowl. I also don't bother peeling the ginger before grating, however, you may prefer to peel some of the skin off. TIP: I often buy a large root of fresh ginger at the market and cut it up into approximately 1" pieces. Then I store the small pieces in a zip lock freezer bag and keep it handy in the freezer to use whenever I need fresh ginger. I just use it frozen, grate it on a microplane and it works beautifully - this way you always have a knob of fresh ginger handy!
    2. After washing and drying your kale, stack the leaves upon one another then roll into a cigar-like fashion. Using a chef's knife, slice it into small pieces then place into a large mixing bowl. I like to remove the thicker part of the stalks located at the base of the leaf. Drizzle the kale with a bit of olive oil, sprinkle with 1 teaspoon of Penang nut & spice mix, sprinkle with a bit of sea salt, then massage the oil & spices into the kale.
    3. To the kale, add the wild rice, pine nuts, thinly sliced apples, and pomegranate seeds. Toss gently and serve.

    Notes

    other Glory Kitchen nut & spice blends which would work well with this salad are Cairo, Mumbai, Provence or San Miguel.

    Pomegranate, Pine Nut and Apple Salad - Glory Kitchen
    Pomegranate, Pine Nut and Apple Salad - Glory Kitchen
    Pomegranate, Pine Nut and Apple Salad - Glory Kitchen
    Pomegranate, Pine Nut and Apple Salad - Glory Kitchen
  • Chicken and Black Bean Stuffed Sweet Potatoes - Glory Kitchen

    CHICKEN AND BLACK BEAN STUFFED SWEET POTATOES

    These Chicken and Black Bean Stuffed Sweet Potatoes are a deliciously satisfying meal-in-one.  The tender flesh of a baked sweet potato is stuffed full of shredded chicken, black beans, spinach and caramelized onions.  The stuffing is mixed together with jack cheese and then baked until it is hot and bubbly, and finally topped with our crunchy blend of Mexican nuts & spices, San Miguel.

    During the fall season of Thanksgiving you often see sweet potatoes combined with all types of sugary ingredients and nuts, however, this version of sweet potatoes lend themselves to savory flavors and I think they work beautifully together.

    This recipe yields six servings and once they are stuffed with the chicken and veggies, they can be quite filling, warm, and satisfying.  I hope you’ll try it out on your hungry family.

    Margie Bruner
    owner of Glory Kitchen

    instagram
    facebook

    Chicken and Black Bean Stuffed Sweet Potatoes

    Yield: serves 6

    Ingredients

    • San Miguel nut & spice mix
    • 6 sweet potatoes
    • 2-3 chicken breasts or 4-5 thighs
    • 1 yellow onion
    • 1 bell pepper, yellow or red
    • 1 can black beans, rinsed
    • 3-4 cups spinach, fresh
    • 1 jalapeño pepper, fresh
    • 2 cups Monterrey jack cheese, shredded
    • queso fresco, for topping
    • olive oil
    • sea salt & pepper

    Instructions

    1. Take the chicken (breasts or thighs) and rub them with a bit of olive oil, season with salt and pepper, place on a baking sheet and place into a 350° oven for 30-40 minutes (or until the juices run clear and the chicken is cooked through). Remove from the oven and allow to cool completely. Once cool, remove the skin, shred the chicken, place into a bowl, and set aside.
    2. At the same time, also place the sweet potatoes into the oven after massaging them each with a bit of olive oil to lightly coat the skin. Place them on a baking tray and put them, along with the chicken, into the 350° oven. Check the potatoes after 30 minutes by pricking with a fork and checking to see if the flesh is tender. They might need an additional 10-20 minutes of baking. Once. they are soft when pierced with a fork, remove from the oven and allow them to cool. The chicken and the sweet potatoes can be cooked the day before.
    3. Chop the onion, bell pepper and garlic. Beginning with the onion, heat about 2 teaspoons of olive oil in a pan then add the onion and cook until it is nicely browned, almost caramelized. To this, add the bell pepper and garlic. Cook for an additional 3 minutes then remove from heat and set aside to cool.
    4. Take about 4 large handfuls (or 4 cups) of fresh spinach and roughly chop but leave them in somewhat large pieces.
    5. Dice the jalapeño pepper into small pieces.
    6. Using a very large mixing bowl, mix together the fresh spinach, shredded chicken, onion/bell pepper/garlic mixture, shredded jack cheese, rinsed black beans and 1/4 teaspoon of salt, a sprinkle of black pepper and 1 teaspoon San Miguel nut & spice mix.
    7. Take the baked sweet potatoes and slice them down the middle. Using your hands, squeeze them open a bit to expose the opening. Using a fork, gently prick & turn the inside flesh of the potato to loosen it up just a bit. Season the inside of each sweet potato with a sprinkle of salt & pepper.
    8. Stuff each potato with a generous amount of the chicken stuffing. Place the stuffed potatoes on a baking sheet and bake in a 400° oven for about 30 minutes or until the inside is hot and bubbly. Remove from the oven and top with a bit of queso fresco and additional San Miguel nut & spice mix. Serve immediately.

    Chicken and Black Bean Stuffed Sweet Potatoes - Glory Kitchen
    Chicken and Black Bean Stuffed Sweet Potatoes - Glory Kitchen
    Chicken and Black Bean Stuffed Sweet Potatoes - Glory Kitchen
    Chicken and Black Bean Stuffed Sweet Potatoes - Glory Kitchen
    Chicken and Black Bean Stuffed Sweet Potatoes - Glory Kitchen
    Chicken and Black Bean Stuffed Sweet Potatoes - Glory Kitchen
    Chicken and Black Bean Stuffed Sweet Potatoes - Glory Kitchen
    Chicken and Black Bean Stuffed Sweet Potatoes - Glory Kitchen
Updating…
  • No products in the cart.

JOIN US !
JOIN
close-link