• Roasted Garlic & Butternut Hummus - Glory Kitchen

    ROASTED GARLIC AND BUTTERNUT HUMMUS

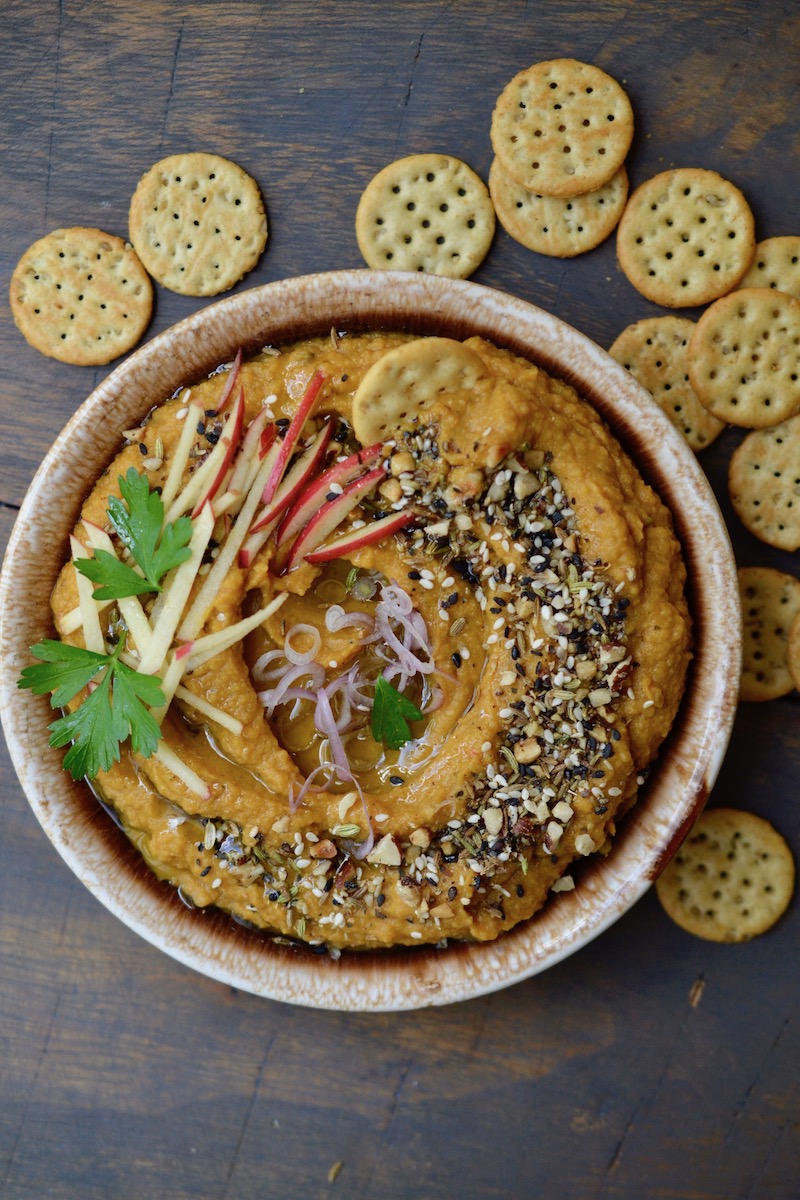
    Set aside your usual basic hummus for this wonderful fall-flavored Roasted Garlic and Butternut Hummus.  The color celebrates fall and the flavor has a touch of sweet and a lot of savory.  Then of course it is highlighted with a generous crusting of our Glory Kitchen Cairo nut & spice mix.

    Whenever I serve hummus topped with one of our Glory Kitchen nut blends, I always make certain to have the jar close by because just as soon as the topping is scooped up, I get requests for another generous sprinkle of the nut blend.  It adds such great texture to the creamy hummus and this Cairo nut blend has peppery spunk.

    This recipe is amazingly quick.  The only extra step after gathering your ingredients is roasting the garlic and butternut, and honestly, if you really aren’t up to spending the time, you can add two or three cloves of raw garlic and open a can of pumpkin.

    The first time I made hummus I realized just how quick and simple it is to make at home.  I vowed to make it homemade more often – and I’ve kept to that promise.

    Hummus is a flavorful dip to pair with the daily vegetables we all need to be eating.  Perfect for dipping carrots, celery, cucumber or broccoli.  I make it a habit to always have canned garbanzo beans (chickpeas) and tahini in the pantry.  If I don’t have a fresh lemon or lime, I substitute with either white wine vinegar or balsamic.  And of course we always have olive oil and garlic, so there’s hardly a time I’m not stocked and ready to throw together a quick batch of hummus.  It also stores beautifully in the refrigerator.

    I hope you’ll try this recipe for Roasted Garlic and Butternut hummus.  Basically, it is just gathering all of your ingredients and whizzing them away in a food processor.  Then poof… it’s ready for delicious dipping!

    Margie Bruner - Glory Kitchen

    Margie Bruner
    owner of Glory Kitchen

    instagram
    facebook

    Roasted Garlic & Butternut Hummus

    Yield: serves 4-8

    Ingredients

    • 2 teaspoons, plus more for garnish Cairo nut & spice mix
    • 2 cups butternut squash, roasted
    • 1/2 head garlic, roasted
    • 1 can (15 oz) garbanzo beans (chickpeas)
    • 2 tablespoons tahini
    • 2 tablespoons olive oil
    • 2 tablespoons balsamic vinegar
    • 1.5 teaspoon sea salt
    • 2 teaspoons maple syrup
    • 1/2 teaspoon coriander
    • 1/4 teaspoon nutmeg
    • pinch of cayenne pepper

    Instructions

    1. Peel the butternut squash and cut into cubes. Because butternut can be difficult to cut, one trick I like to use is to microwave the entire squash for 3-4 minutes, allow it to cool somewhat, then peel, slice and cube. This softens the flesh a bit and makes the slicing so much easier.
    2. Or, you can always buy already prepped & cut squash at the grocery store. 🙂
    3. Slice the garlic across the entire head at the non-root side so the garlic cloves are exposed (no need to peel). Place both the garlic head and the cubed butternut onto a lined baking sheet. Drizzle with olive oil, sprinkle with sea salt, and toss gently.
    4. Place into a hot 425° oven and roast until both are lightly browned. Remove and cool completely. This can be done the day before.
    5. Place all of the ingredients into a food processor and puree until it is nice and smooth. Add 1 tablespoon of water, one at a time, until you reach the desired consistency.
    6. Spoon the hummus into a nice serving bowl. Dredge the top with the back of a spoon in a circular formation to make a bit of a spiral well. Drizzle the creases with olive oil and then finish the top with a generous amount of Cairo nut & spice mix. I also like to add a few fall garnishes for decoration right before I serve. Ideas might be matchstick sliced apples, small cubes of butternut, chopped herbs, matchstick radishes, pickled okra or cornichons , small cubes of carrots, just peruse your refrigerator for ideas.
    7. Serve with slices of pita bread, pita chips, crackers, carrot sticks, celery sticks or other fresh veggies.

    Notes

    Other Glory Kitchen nut blends which would work well with this Roasted Garlic and Butternut Hummus is the Mumbai blend or the San Miguel blend.

    Roasted Garlic & Butternut Hummus - Glory Kitchen
    Roasted Garlic & Butternut Hummus - Glory Kitchen
    Roasted Garlic & Butternut Hummus - Glory Kitchen
  • Bourbon Toffee - Glory Kitchen

    BOURBON TOFFEE

    My Bourbon Toffee is uniquely different from a typical chocolate & nut toffee.  First and foremost, it has, well, bourbon! A splash of bourbon adds a wonderful dimension of flavor to toffee.  It also has a saltine cracker base which gives it a salty, crispy, crunch.  And finally, for a pop of flavor, I’ve added a light sprinkle of our Glory Kitchen Cairo nut & spice mix. The nut blend adds a peppery punch – a surprise element of spicy flavor to balance out the sweetness of the toffee and chocolate.

    All of these ingredients added to a sweet bite of candy may sound pretty far out there but trust me, they really do work.  The surprise flavors are subtle but wonderfully unique, they make your toffee stand out in a fresh new way.

    With football watching parties and the holidays approaching, this Bourbon Toffee is sure to be a crowd pleaser.  Scroll down and you’ll see how I packaged these sweet treats to place into wedding goodie bags.

    Margie Bruner
    owner of Glory Kitchen

    instagram
    facebook

    Bourbon Toffee

    Yield: makes about 6-8 servings

    Ingredients

    • Cairo nut & spice mix
    • 1 cup butter, unsalted
    • 1 cup sugar
    • 1/2 cup bourbon
    • 1/4 teaspoon sea salt
    • 36 saltine crackers
    • 12 oz semi-sweet chocolate pieces
    • 1 1/2 - 2 cups almonds, walnuts or pecans, chopped
    • you will need a candy thermometer

    Instructions

    1. Measure and prepare all the ingredients and have them ready before you begin. Line a sheet tray (approx. 9"x13") with aluminum foil or a piece of parchment paper. Spray the foil with oil. Line the sheet tray with 1 layer of saltine crackers. Set the tray aside.
    2. Using a large pot, add butter, sugar, bourbon, and sea salt and heat it over low heat until the butter is melted. You only need to stir it a few times, just let all the ingredients melt together. Bring it to a low boil, over medium heat, and attach a candy thermometer to the side of the pot. Allow the mixture to boil until it turns a slight golden color and the thermometer reaches close to hard ball stage.
    3. At this stage work very carefully when handling the toffee - boiling sugar can be dangerously hot. Remove from the heat and using a ladle, spoon the hot mixture gently over the crackers until you've emptied the entire pot onto the tray. Using an off-set spatula (the type used for icing a cake), smooth the toffee so it spreads over all of the crackers.
    4. Sprinkle the chocolate pieces evenly over the hot toffee. Allow it to sit for about 4-5 minutes to let the heat from the toffee slowly melt the chocolate. Using the cleaned off-set spatula again, smooth the chocolate over the toffee layer so it is evenly spread.
    5. Sprinkle the nut pieces over the warm chocolate layer until they are evenly distributed. Lightly sprinkle the nut layer with a touch of Cairo nut & spice mix. Take your hands and gently pat down the nuts and the Cairo nut blend into the warm chocolate.
    6. Allow the toffee to cool completely. I place it into the refrigerator for about an hour. When completely cooled, remove from the tray and remove all of the foil from the back. Place the block of toffee onto a cutting board and cut slices about 3" thick. Then take the slice and cut it into small triangles. Much of the toffee will crumble into small pieces, which is fine. Store the toffee in the refrigerator or in a very cool, dry place until about 30 minutes before serving. Enjoy!

    Notes

    Any type of nut can be used for this toffee. I like almonds best, however, I've made it often using walnuts, pecans, or peanuts. Also, if you don't want to use the bourbon you can leave it off. It adds an interesting dimension of flavor, but is equally delicious without it.

    Bourbon Toffee - Glory Kitchen
    Bourbon Toffee - Glory Kitchen
    Bourbon Toffee - Glory Kitchen
    Bourbon Toffee - Glory Kitchen
    Bourbon Toffee - Glory Kitchen
    Bourbon Toffee - Glory Kitchen
    Bourbon Toffee - Glory Kitchen
  • Charred Romaine with Green Goddess Dressing - Glory Kitchen

    CHARRED ROMAINE WITH GREEN GODDESS DRESSING

    If you love a good salad but want something new and different, try serving this Charred Romaine with Green Goddess Dressing.  The slight wilting of the romaine lettuce and charred leaves give it a nice, smoky, and intense flavor.

    This salad is garnished with fresh toasted corn and a creamy, herb flavored Green Goddess dressing with hints of Indian spices from our Glory Kitchen Mumbai nut & spice mix.  Sprinkled on the lettuce before it goes under the broiler, the nuts & spices intensify in flavor and they add a nice crunch to the salad.

    Trendy restaurants have recently popularized grilled romaine lettuce salads, however, here I’ve bypassed the grill and placed it under a hot broiler for just a few minutes to char the delicate edges and give the firm romaine just a bit of a wilt.  Once it is browned, I quickly remove it from the oven, allow it to slightly cool, and serve the salad right away topped with corn and some crunchy nut flavor from our nut blends.

    If you happen to have any leftover Green Goddess dressing it is also great for raw veggie dipping, a sauce drizzled over fish, or a spread on a sandwich.  I love the bright green color from the avocado and fresh herbs and the flavor is fresh and creamy.

    Experiment with this recipe and toss it with any of our other Glory Kitchen nut blends if you wish to move it in another flavor direction.  Enjoy!

    Margie Bruner - Glory Kitchen

    Margie Bruner
    owner of Glory Kitchen

    instagram
    facebook

    Charred Romaine with Green Goddess Dressing

    Yield: serves 4

    Ingredients

      For the dressing:
    • 1/2 avocado, ripe
    • 1/2 clove garlic
    • 1 1/2 tablespoons apple cider or white wine vinegar
    • 1/2 lemon
    • 2 teaspoons honey
    • 1 anchovy (or not if you dislike)
    • 1 cup fresh herbs (any combination) parsley, thyme, tarragon, cilantro, basil, chives, oregano
    • 1 teaspoon sea salt
    • 1/2 teaspoon pepper
    • water (1/4 -1/2 cup)
    • 1/2 cup olive oil
    • 1 tablespoon red onion, chopped very small
    • For the charred salad:
    • Mumbai nut & spice mix
    • 2 heads of romaine lettuce
    • 2 ears of corn
    • red onion, sliced very thin (for garnish)
    • olive oil
    • sea salt

    Instructions

      for the dressing:
    1. In a blender, mix together avocado, garlic, vinegar, lemon juice, honey, anchovy, herbs, water, salt & pepper until smooth. If you are not a fan of anchovies, you can certainly leave these out but I think they add a great salty flavor to the dressing. Slowly add in the olive oil until it is smooth. If it is too thick, add a bit more water (1 tablespoon at a time) until the right consistency is achieved for a creamy dressing. Taste and season with more salt and pepper if needed. Toss the chopped red onion into the blended dressing and stir in with a spoon. Set the dressing aside and allow to sit at room temperature while the salad is being prepared.
    2. for the charred salad:
    3. Set the oven to broil and place the oven rack on the upper third of the oven. Not the very top, but close.
    4. Clean the ears of corn and place them on a foil lined baking sheet. Drizzle with a bit of olive oil and a sprinkle them with a bit of sea salt. Place them in the oven, under the broiler, and allow them to brown a bit (but not burn). Using tongs, turn them a bit so all sides get a bit toasted. If they are put into a hot oven, this process should only take a few minutes so stay close to the oven. Remove from the oven and allow to cool completely. Using a large knife, cut the kernels off each ear. Place the toasted corn in a bowl.
    5. Leaving the cores intact, and using a large chef's knife, slice each head of romaine lettuce in half lengthwise. Place them cut side up on a foil lined baking sheet and drizzle each one with olive oil. Sprinkle with a bit of sea salt and some Mumbai nut & spice mix. Place in the oven, under the broiler and keep a close eye to make certain they do not burn. When the edges are charred and just a bit wilted, remove from the oven and let them cool.
    6. Arrange the charred romaine on a serving platter or on individual serving plates. Sprinkle the toasted corn across the lettuce heads. Top with very thin slices of red onion and then drizzle with the Green Goddess dressing. Top them with a sprinkle of Mumbai nut & spice mix and enjoy!

    Notes

    These charred romaine leaves would be wonderful with any of the other Glory Kitchen blends. If you choose to try the Provence blend, I would add a few sprinkles of currants or raisins over the whole dish which would add a nice sweetness to the salad.

    Charred Romaine with Green Goddess Dressing - Glory Kitchen
    Charred Romaine with Green Goddess Dressing
    Charred Romaine with Green Goddess Dressing - Glory Kitchen
    Charred Romaine with Green Goddess Dressing - Glory Kitchen
    Charred Romaine with Green Goddess Dressing - Glory Kitchen
  • Roasted Garlic - Glory Kitchen

    ROASTED GARLIC

    Roasted Garlic is a great ingredient to use in dips, dressings, soups, hummus, cheese trays, bread, pizzas, or just topped on tasty crackers.

    Garlic in its raw state can be pungent and leave a strong after taste, however, once it is roasted, it becomes sweet, creamy, and deliciously caramelized.

    Sister to onions, shallots and leeks, garlic has many proven health benefits and medicinal properties.  It’s often touted as one of “the world’s healthiest foods”, so roasting it in large batches and keeping it on hand to be ready to throw into recipes is a great routine to have.

    I’ve seasoned this batch of garlic with the Asian nutty flavors of our Glory Kitchen Penang nut & spice mix which adds a bit of red pepper heat and a hint of ginger.  I think any of our Glory Kitchen nut blend flavors would make a great seasoning enhancer to Roasted Garlic – it just depends upon the flavor that moves you, Mexican, Asian, Indian, Italian, French or Middle Eastern.  The process is easy and the rewards are delicious. 

    Margie Bruner
    owner of Glory Kitchen

    instagram
    facebook

    Roasted Garlic

    Ingredients

    Instructions

    1. Heat the oven to 450°.
    2. Take the bulb (full head) of garlic and slice off the entire top to expose a flat layer of each clove. (see photo). Arrange the full bulbs with skins on, face up in a baking dish & drizzle the tops with olive oil. Sprinkle all the bulbs with sea salt and a generous amount of Penang nut & spice mix.
    3. Cover the baking dish tightly with aluminum foil and place in the hot oven for 30 minutes. Remove from the oven, uncover, and allow them to cool completely.
    4. Take each head of garlic, and with your hands, squeeze out each individual garlic clove into a bowl (see photo). Some cloves might be a bit soft and will squish out. Divide these up into what you will use now and place the leftovers into small freezer-safe bags to have ready for future recipes. I usually package each baggie with 10-15 cloves each.
    5. Use the Roasted Garlic cloves when making dips, pizza, sauces, soups, casseroles, or hummus... the sky's the limit.

    Notes

    Any of the Glory Kitchen nut & spice blends would be a great seasoning to Roasted Garlic.

    Roasted Garlic - Glory Kitchen
    Roasted Garlic - Glory Kitchen
    Roasted Garlic - Glory Kitchen
    Roasted Garlic - Glory Kitchen
    Roasted Garlic - Glory Kitchen
    Roasted Garlic - Glory Kitchen
  • Blue Cheese Stuffed Figs - Glory Kitchen

    BLUE CHEESE STUFFED FIGS

    Fresh figs are very seasonal, and sometimes hard to come by so when local figs become available in late summer I like to take advantage of them as much as possible.  These Blue Cheese Stuffed Figs are a showstopper appetizer and make a nice sweet and tangy cheese combination.  By keeping it simple the organic shape and deep colorations of the fig can be highlighted and the many contrasting flavors taste amazing.

    The sharp and salty flavor of blue cheese paired with the sweet and tender flesh of a ripe fig are a perfect match.  With the added sweetness of fragrant honey and the crunchy almonds and spices from our Glory Kitchen Mumbai nut and spice mix, you get a full flavor bite.  The Indian flavors from the Mumbai mix add an interesting note of heat and spice to the otherwise sweet and creamy fig.

    Blue cheese is a blanket term for a creamy but pungent cheese which has blue or grey cultured mold veined throughout.  Blue Cheese can go by many names and some, such as Roquefort, Gorgonzola, and Stilton carry a protected designation of origin label, which means to be called such, they must originate from that particular European region.  Blue Cheeses without a protected origin name are simply called “blue cheese”.  Regardless of they type of blue cheese used, the unique sharp flavor is a perfect contrast to the sweet fig.

    Other Glory Kitchen nut blends which work well with this appetizer are the Cairo Middle Eastern blend or the Provence French blend.  If using the Provence blend, I would allow it to saturate in the honey for a few minutes before adding the drizzle to help reconstitute the dried herb flavors.

    If it’s summer, find some figs and pair these little flavor bites with a nice, cool, glass of wine.

    Margie Bruner
    owner of Glory Kitchen

    instagram
    facebook

    Blue Cheese Stuffed Figs

    Yield: Serves 8-10

    Ingredients

    Instructions

    1. Allow the block of blue cheese to come to room temperature.
    2. After washing and drying figs, snip the stems off and cut an X in the top until the knife reaches about half way down the fig. Do not cut all the way through.
    3. Take a spoonful of cheese and with the fig in one hand and the cheese in the other, carefully open the fig and stuff the cheese into the center cavity. Work gently so the fig stays intact and does not bruise or disfigure.
    4. Arrange the stuffed figs on a serving platter, drizzle generously with honey. Sprinkle the tops generously with Mumbai nut & spice mix.
    5. Garnish with thinly sliced fresh mint or tiny little mint leaves. Serve at room temperature as an appetizer with a crisp glass of wine.

    Notes

    These Blue Cheese Stuffed Figs would also be wonderful using the Glory Kitchen Cairo or Provence blends.

    Blue Cheese Stuffed Figs - Glory Kitchen
    Blue Cheese Stuffed Figs - Glory Kitchen
    Blue Cheese Stuffed Figs - Glory Kitchen
    Blue Cheese Stuffed Figs - Glory Kitchen
  • BLACKBERRY AND PARMESAN APPETIZER

    Here’s an easy way to enjoy fresh summer blackberries during their peak season.  This super simple Blackberry and Parmesan Appetizer always pleases and pairs beautifully with a glass of crisp white wine – perfect for outdoor cocktail parties, or a seated Al fresco dinner.

    The sweet and tangy blackberry fruit, salty chunks of cheese and peppery  flavors of our Glory Kitchen Cairo nut & spice mix create a lovely combination of flavor.  Parmegiano reggiano cheese is robust and nice on its own, however, when partnered with tangy blackberries you get a fresh burst of summer flavor.

    This same recipe would also pair well with our Glory Kitchen Mumbai nut & spice mix.  The pungent Indian flavors in the Mumbai blend adds a nice heat to the sweet honey and fruity berries.

    Feel free to swap out the berries to whatever is in season.  If you have access to fresh-picked blueberries, raspberries or strawberries, all would be a great match with salty parmesan slices.

    No slaving away at a hot oven for this appetizer.  With just a few ingredients and several minutes of slicing, this Blackberry and Parmesan Appetizer can be served to guests in no time.  Enjoy!

    Margie Bruner
    owner of Glory Kitchen

    instagram
    facebook

    Blackberry and Parmesan Appetizer

    Yield: approximately 6 servings

    Ingredients

    • Cairo nut & spice mix
    • 10-12 oz.fresh blackberries
    • 1/2 lb block parmigiano reggiano cheese
    • 2 tablespoons balsamic vinegar
    • 1 tablespoon honey + more for drizzling
    • 1/2 lime juice, fresh
    • 1 handful mint, fresh

    Instructions

    1. Slice about 1/3 of the blackberries in half lengthwise and place all the berries into a bowl. To this berry bowl, add balsamic vinegar, honey and fresh lime juice. Sprinkle in some of the mint which has been sliced (julienned) very thin. Using a spoon, carefully turn and mix the berries to incorporate the juices. Set the berries aside to macerate for about 30 minutes.
    2. Take the block of parmigiano reggiano cheese and carefully cut it into slices (see photo).
    3. If serving this appetizer on one large platter, arrange all the cheese slices on a serving plate. If serving individual portions, arrange the cheese, fanning it out on one side of the plate. For individual servings, I would place about 3-4 slices per person.
    4. Just before you are ready to serve, spoon the blackberries beside the parmesan cheese slices.
    5. Drizzle the parmegiano reggiano cheese with a bit of honey and then sprinkle it generously with Cairo nut & spice mix mix and torn fresh mint leaves. Serve immediately with a chilled glass of white wine.

    Blackberry and Parmesan Appetizer - Glory Kitchen
    Blackberry and Parmesan Appetizer - Glory Kitchen
    Blackberry and Parmesan Appetizer - Glory Kitchen
    Blackberry and Parmesan Appetizer - Glory Kitchen
  • GRILLED PEACH AND CRAB MEAT SALAD

    When it is peach season, summer peaches are one of the most flavorful and delicious fruits – BUT, only if they are in season and picked at the perfect time.

    There is nothing worse than a mealy and tasteless peach.  On the other hand, there is nothing more utterly delicious than a sweet & juicy peach.  This recipe for Grilled Peach and Crab Meat salad calls for grilling, however, a freshly cut peach sans the cooking would be just as tasty.  Skipping the grill would retain the firmness of the fruit.  In this salad version, however, I chose to grill, which brings out an intense and caramelized flavor and a melt-in-your mouth tender bite.

    The soft butter lettuce paired with lacey and somewhat bitter frisée lettuce makes a nice bed of greens for the tender peaches and delicate crab meat.

    I’ve added our Glory Kitchen Mumbai nut & spice blend to the dressing to add some spunky flavor and a touch of heat.  Other seasonings which would also work well with this salad are the Glory Kitchen Cairo, Provence or Penang nut & spice mixes.  Toasted sunflower seeds and a bit more Mumbai nut & spice mix sprinkled on top adds an element of crunch.

    If peaches are not available in your area, try this same recipe using plums, apricots, nectarines, or cherries – stone fruits are abundant all summer long.

    Margie Bruner
    owner of Glory Kitchen

    instagram
    facebook

    Grilled Peach and Crab Meat Salad

    Yield: makes 4 large salads or 6 small, side salads

    Ingredients

      For the dressing:
    • 2 teaspoons Mumbai nut & spice mix
    • 4 tablespoons olive oil
    • 1 small lemon, juice & zest
    • 2 tablespoons balsamic vinegar
    • 2 teaspoons dijon mustard
    • 2 teaspoons honey
    • 2 pinches sea salt
    • For the salad:
    • Mumbai nut & spice mix, for a final sprinkle
    • 1 head butter lettuce (also called bibb or boston lettuce)
    • 1 head frisée lettuce (also called curly endive or chicory)
    • 6 ripe peaches
    • 1/4 cup sunflower seeds, toasted
    • 8 oz. lump crab meat
    • dressing (recipe listed above)
    • olive oil
    • pinch of sugar
    • pinch of salt
    • squeeze of lemon

    Instructions

    1. In a bowl, whisk together all the ingredients for the dressing and set aside.
    2. Heat a small pan on the stove top and add the sunflower seeds. Gently toast them until they are just a tad brown. Stay close by because the seeds are small and can burn very quickly. Remove sunflower seeds from the pan and allow the seeds to cool completely.
    3. Slice each peach in half and gently remove each pit. Drizzle each peach with a bit of olive oil, rub the open flesh side with your hands to coat it with a bit of oil. Place the peaches flesh face side up on a baking tray. Sprinkle each with a pinch of salt and a generous pinch of sugar. Place each peach, face down, on to a hot grill and grill just until they are a bit caramelized and have grill marks. Remove from heat and allow to cool completely. As an alternative to grilling, you can lay the peaches face up on a baking sheet and place under a hot broiler in the oven. Broil just until the tops caramelize just a bit. Remove from oven and allow them to cool completely.
    4. Separate each leaf of the butter lettuce and place into a large mixing bowl. Drizzle with some of the pre-made dressing and with your hands, gently coat the lettuce leaves with a bit of dressing. Arrange the leaves in a circle onto each individual serving plate. Next, do the same with the frisée lettuce; remove the stems and break into bite sized pieces. Using the same dressing bowl, drizzle them with a bit of dressing and coat the leaves gently. Layer the frisée on top of the already arranged butter lettuce. Now take 3 half peaches and arrange them on top of the frisée lettuce. (If you are making small, side salads, I would use two half peaches per serving)
    5. Gently top each salad with a serving of lump crab meat, taking care not to break up the pieces and trying to keep the crab chunks intact. Top each salad with a generous amount of toasted sunflower seeds.
    6. Just before serving, drizzle each salad with additional dressing, give it a light squeeze of fresh lemon juice and finally, a sprinkle of additional Mumbai nut & spice mix. Serve immediately.

    Grilled Peach and Crab Meat Salad - Glory Kitchen
    Grilled Peach and Crab Meat Salad - Glory Kitchen
    Grilled Peach and Crab Meat Salad - Glory Kitchen
    Grilled Peach and Crab Meat Salad - Glory Kitchen
    Grilled Peach and Crab Meat Salad - Glory Kitchen
  • HOMEMADE PEANUT BUTTER

    Who knew making Homemade Peanut Butter could be so simple and so delicious? I never quite believed when I read or heard that you could take fresh, whole nuts and whirr them away in a food processor until creamy nut butter immerged, but it really is true.

    My husband has had a lifelong love and obsession for peanut butter.  After becoming more conscious about the foods we ate, we grew more diligent about reviewing ingredient lists on products, and discovered most commercial jars of peanut butter were loaded with chemicals.  We made the switch to buying pure almond and peanut butters at specialty grocery stores where the only ingredient coming out of these large nut crushing machines is pure almonds or peanuts.

     This week I experimented with making my own nut butters using a variety of nuts and infusing them with spices, peppers and of course our Glory Kitchen nut and spice mixes.  My hazelnut & chocolate butter (does Nutella come to mind?) received a pop of heat from our San Miguel nut & spice mix.  The Asian peanut butter was blended with tahini and our Penang nut & spice mix, and the Middle Eastern flavored almond & peanut butter received an infusion of our Cairo nut & spice mix.

    All three nut butter varieties had their own unique flavor, but all were delicious and so much more interesting than a straight up version of peanut or almond butter.  We are loving the hazelnut & chocolate spread over bananas and strawberries.  The Asian peanut butter is great on crackers with a drizzle of honey and additional crunchy Penang nut & spice mix sprinkled on top.  The Middle Eastern nut butter is great in a peanut butter and jelly sandwich.

    If you have a food processor, you too can easily make your own homemade peanut butter.  The best part is you have delicious nut butters, made with real, plant-based ingredients and no chemicals, preservatives, or additives.

    I hope you’ll give it a try; it’s great fun to watch the transformation and you’ll be thrilled with the homemade result.

    Margie Bruner
    owner of Glory Kitchen

    instagram
    facebook

    Homemade Peanut Butter

    each blend makes 1-2 jars

    Ingredients

      Spicy Hazelnut & Chocolate Butter:
    • 1 tablespoon San Miguel nut & spice mix
    • 3 1/2 cups hazelnuts, roasted or raw
    • 1 cup dark chocolate chips, or less if you want it less sweet
    • 1/2 teaspoon cayenne pepper
    • 1/8 teaspoon sea salt
    • Middle Eastern Almond & Peanut Butter:
    • 1 tablespoon Cairo nut & spice mix
    • 2 cups peanuts, roasted or raw
    • 2 cups almonds, roasted or raw
    • 1 teaspoon sea salt
    • Asian Peanut Butter:
    • 1 tablespoon Penang nut & spice mix
    • 4 cups peanuts, roasted or raw
    • 1/2 cup tahini
    • 1 tablespoon soy sauce
    • 1/2 teaspoon sea salt

    Instructions

    1. If you prefer a more intense and roasted nut flavor, and you're working with raw nuts, spread your nuts onto a baking tray and place into a 375° oven. Toast the nuts just until they are lightly browned. Remove from the oven and allow to cool completely. If you prefer to keep your nuts raw, move forward with mixing them in a food processor.
    2. If you are working with whole nuts, place all the nuts into a food processor and pulse until the nuts break down into small pieces. Add the remaining ingredients and whirl away until the mixture turns into a creamy butter. The more you process, the creamier the mixture will get, so if you prefer a crunchy or thick butter, do not process as long. As it mixes, stop and taste your flavors. If you like more heat on the Hazelnut Butter, add more cayenne. If you like it a bit saltier, add more salt. Just a little pinch at a time because salt and cayenne can overpower the butters very quickly, so add cautiously.
    3. Pour your finished butters into canning jars and enjoy! They stay fresh longer if they are stored in the refrigerator, however, these can be left out on the counter at room temperature for about 1 week.

    Notes

    You can really get creative on flavors for homemade nut butters. Don't be afraid to experiment! Our Glory Kitchen Mumbai nut blend would also work well in a nut butter.

    Homemade Peanut Butter - Glory Kitchen
    Homemade Peanut Butter
    Peanut Butter
    Homemade Peanut Butter - Glory Kitchen
    Homemade Peanut Butter - Glory Kitchen
    Homemade Peanut Butter - Glory Kitchen
    Homemade Peanut Butter - Glory Kitchen
    Homemade Peanut Butter - Glory Kitchen
    Homemade Peanut Butter - Glory Kitchen
    Homemade Peanut Butter - Glory Kitchen
  • RED, WHITE, AND BLUE SALAD

    This Red, White and Blue Salad recipe is a simple dish for celebrating anything patriotic in the USA.  Monday is Memorial Day and it doesn’t take much to whip up a bright and colorful salad.  Serve it on solid white, blue & white, or red accented dinnerware, and make the holiday feel just a bit more festive.  Even if you don’t have grand plans for the Memorial Day holiday, a touch of patriotism can brighten the day.

    To add a peppery bite to this salad I’ve used our Middle Eastern blend, Cairo nut & spice mix , however, the French blend, Provence, would add a nice herbaceous flavor, or the Indian blend, Mumbai, would add real spunk.  I’ve used blackberries in this salad because I love the shape and flavor of these berries, however, blueberries are also a great color choice and they too bring a touch of sweetness to the mix.

    A tip for presentation is to section each ingredient when arranging them onto the tossed greens to make the distinctive colors stand out.

    Memorial Day typically marks the beginning of summer and is always celebrated on the last Monday of May.  It originated at the end of the American Civil war, in 1868, when Union veterans would decorate the graves of those who died in service to our country during that war.  It was first called “Decoration Day” but later changed to “Memorial Day” and is now intended to honor all United States deceased veterans who have served our country.

    Thank you to all who have served and wishing you and your family a joyful holiday.

    Margie Bruner - Glory Kitchen

    by: Margie Bruner, owner of Glory Kitchen
    instagram
    facebook

    Red, White & Blue Salad

    Ingredients

      For the salad:
    • Cairo nut & spice mix
    • mixed dark baby greens or mesclun mix
    • pine nuts, lightly toasted
    • grape tomatoes, sliced
    • blackberries, fresh
    • roasted chicken, shredded
    • feta cheese, crumbled
    • balsamic vinaigrette
    • For the balsamic vinaigrette
    • 2 teaspoons Cairo nut & spice mix
    • 3 tablespoons olive oil
    • 2 ½ tablespoons balsamic vinegar
    • 2 teaspoons dijon mustard
    • 1-2 teaspoon honey
    • pinch of salt

    Instructions

      for the balsamic vinaigrette:
    1. Whisk together the ingredients for the dressing and set aside.
    2. for the salad:
    3. Shred the roasted chicken into small pieces and set aside. True confessions - I often buy an already roasted chicken at the grocery store and shred it for salads, pot pies, and other recipes which call for shredded chicken. It makes the process sooo much quicker and who doesn't want a shortcut that makes life a bit easier, right?
    4. Toast the pine nuts in a small pan over medium heat until lightly browned and set aside to cool. Work quickly and be ready to remove them from the heat onto a plate because they can burn in no time. (they taste delicious raw as well if you prefer not to toast)
    5. Slice the grape tomatoes into small rounds and set aside.
    6. When you are ready to serve, toss the greens with a bit of balsamic vinaigrette and arrange them on a serving plate. Arrange each ingredient over the dressed greens in sections to highlight the individual bright colors; pine nuts, tomatoes, blackberries, chicken, and crumbles of feta cheese.
    7. Drizzle the top with a bit more vinaigrette and top the chicken section with Cairo nut & spice mix. Serve immediately.

    Notes

    Other Glory Kitchen nut and spice mixes which I think would work well with this salad are the Provence and Mumbai blends. If using the Provence mix, I would trade out the pine nuts for toasted whole cashews.

    Red, White, and Blue Salad - Glory Kitchen
    Red, White, and Blue Salad - Glory Kitchen
    Red, White, and Blue Salad - Glory Kitchen
Updating…
  • No products in the cart.

JOIN US !
JOIN
close-link